GitHub Actions
I have been using Azure Pipelines for a few years now, and am a huge fan. Starting out on my technical learning journey over two years ago, I had to quickly become familiar with JSON for ARM templates, C# for customer demos, and PowerShell & Bash for scripting.
It was quite a steep curve (and the learning continues!!), and so being able to create build and release pipelines in Azure DevOps (ADO) using the UI was almost a welcome break. I got hands on with Jenkins also, but I have to admit, Azure DevOps felt more accessible and user friendly to me (though Jenkins absolutely has its place).
I have been using yaml in my learning around Kubernetes and Helm, but nothing major and not too regularly. Azure Pipelines with yaml was introduced recently, and in fact, is now the default experience for creating Build pipelines.. yet I still prefer the designer. I know that yaml pipelines makes for better practice; by constructing build and release pipelines as code, they can be kept with source control and versioned.
Enter Github Actions!
So I have a GitHub account, several repos and am comfortable using Git to interact with my code. That’s about where it ends! I have gone as far as integrating my repo with a DevOps Pipeline for deploying into Azure web apps, AKS etc, but still relying on my lovely UI-designed pipelines to take care of the deployment business.
GitHub Actions are the quivalent of Azure DevOps tasks. You may be familiar with the extensive ADO marketplace where you can find pretty much any task fit for the job (or you can create your own!). So if GitHub Actions == Tasks, then GitHub WorkFlows == Pipelines.. sort of.
My very first workflow I built was to build, test and publish a .NET 2.2 web application, and to build a container image and publish it to Azure Container registry. Finally, I wanted to learn a bit more about Github Releases, so my workflow also publishes a new release. You can view it here.
Let’s break it down.
name: ASP.NET Core CI

on: [push]
Pretty self explanatory - my workflow has a name (ASP.NET Core CI) and it has a trigger (on: [push]). When I push a commit to my repo, this workflow will trigger. I could choose a different event trigger, like a pull request or on a schedule. If I wanted to, I could have it triggered by a webhook - I want to explore this more in the future, and figure out how to trigger a workflow from another workflow based on whether it succeeded or not, which looks totally doable.
jobs:
  build-web:

    runs-on: ubuntu-latest

    steps:
    - uses: actions/checkout@v1
    - name: Setup .NET Core
      uses: actions/setup-dotnet@v1
      with:
        dotnet-version: 2.2.108
    - name: Build with dotnet
      run: dotnet build eShopOnWeb.sln
Next, I give my workflow some jobs to carry out. The first job is called build-web and I specify what environment I need this job to run on. I have chosen ubuntu-latest but equally I could choose another version of Ubuntu or choose a Windows environment instead.
I then specify the steps that my job must carry out. The first thing I want to do is to checkout my repo, and there is an action available to do this for me. To use an action, we specify the version we want to use, in this case actions/checkout@v1. I then call the second action needed for this workflow, actions/setup-dotnet@v1 and we give it a friendly name to make the workflow more readable (Setup .NET Core). You can find these actions in the marketplace.
The with command can be used to specify which version of dotnet to target. It can also be used to set environment variables, which I will show you in a minute!
Now, I need my job to run the typical dotnet build, test, run and publish commands. I give each one a friendly name, followed by the run command.
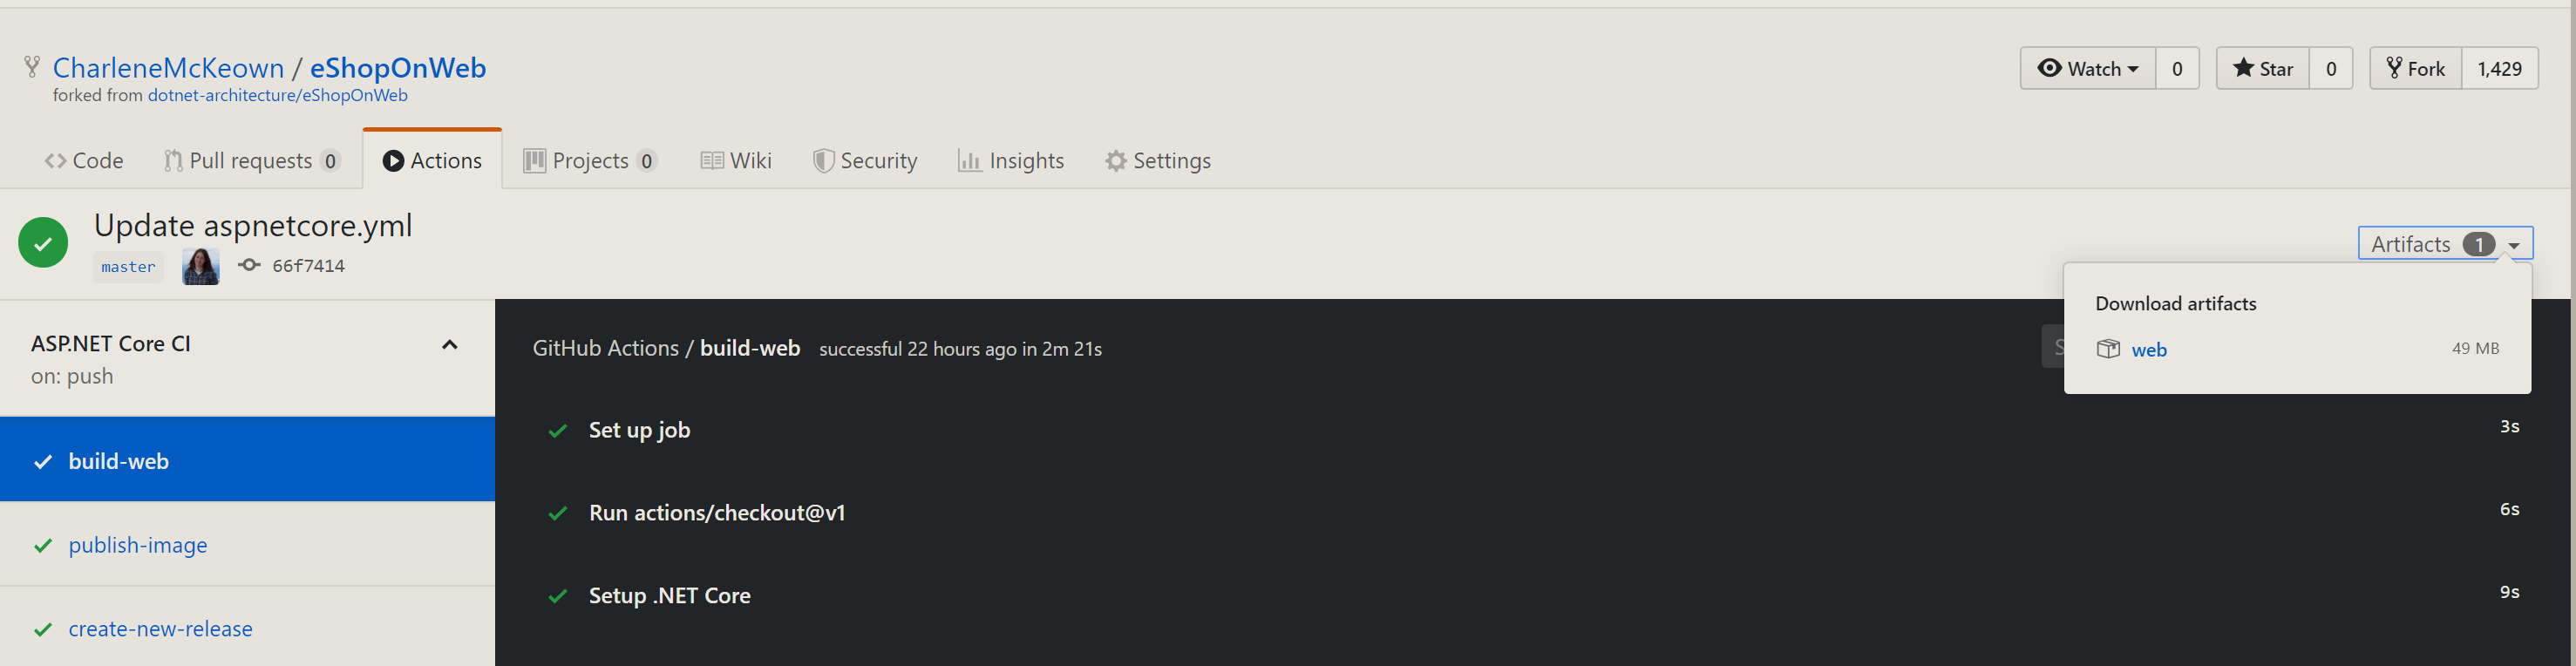
Lastly, I want to make sure that my artifacts are made available to me. Once the workflow finishes, the environment will be binned, so it’s important to publish the artifacts somewhere that will be accessible.
    - name: Publish artifacts
      uses: actions/upload-artifact@master
      with:
        name: web
        path: src/Web/bin/Release/netcoreapp2.2/publish
There is an action for that :) Like before, I give it a name and tell it what action to use. I use the with command again to specify a name for the artifact, and where it can be found (in this case, the publish folder). Once the workflow completes, artifacts can be downloaded as shown below.
So I could stop there. I have a deployable artifact that could be published to an Azure Web App within seconds. However, given I am trying to upskill in container tech, I want to add another job to build my docker image and publish it to my own container registry. Let’s do it!
publish-image:

    needs: build-web
    runs-on: ubuntu-16.04

    steps:
    - uses: actions/checkout@master
    - name: Publish to Registry
      uses: elgohr/Publish-Docker-Github-Action@master
      with:
        name: mec35.azurecr.io/eshopwebmvc
        username: ${{ secrets.ACR_USER }}
        password: ${{ secrets.ACR_PASSWORD }}
        registry: ${{ secrets.ACR_SERVER }}
        dockerfile: ./src/Web/Dockerfile
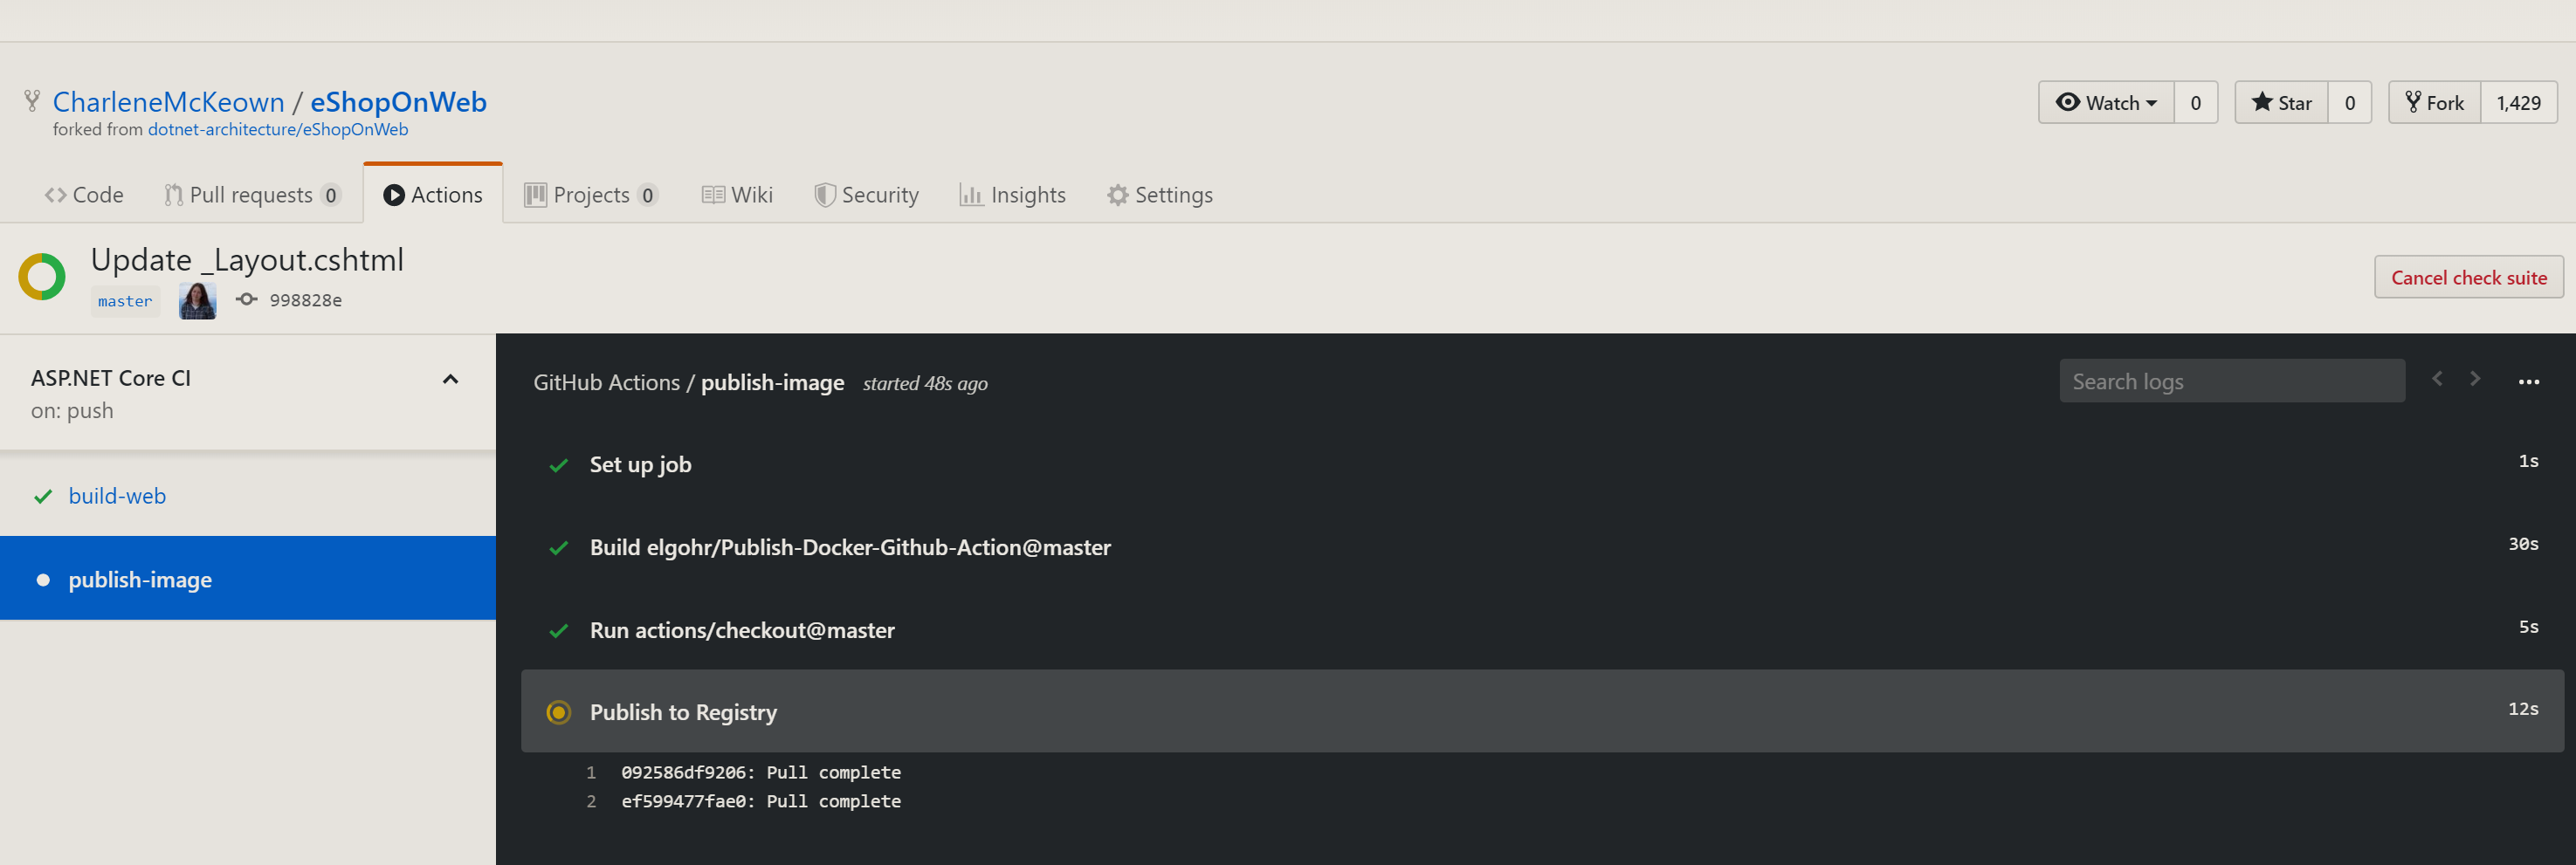
Like the job before it, I give it a name publish-image. I also want to make sure that this job only runs if the build-web job succeeds, and I can do this by specifying needs. I could also specify multiple prior jobs by using an array. The job is given an environment to run in, and some steps to carry out the Docker commands needed to build and push the image. These Docker commands are wrapped up and encapsulated in the elgohr/Publish-Docker-GitHub-Action@master action.
Now, to access my container registry in Azure (ACR) , I need to pass some secrets to my action. To do this, I set secrets in GitHub, passing in my ACR username, password and registry address.
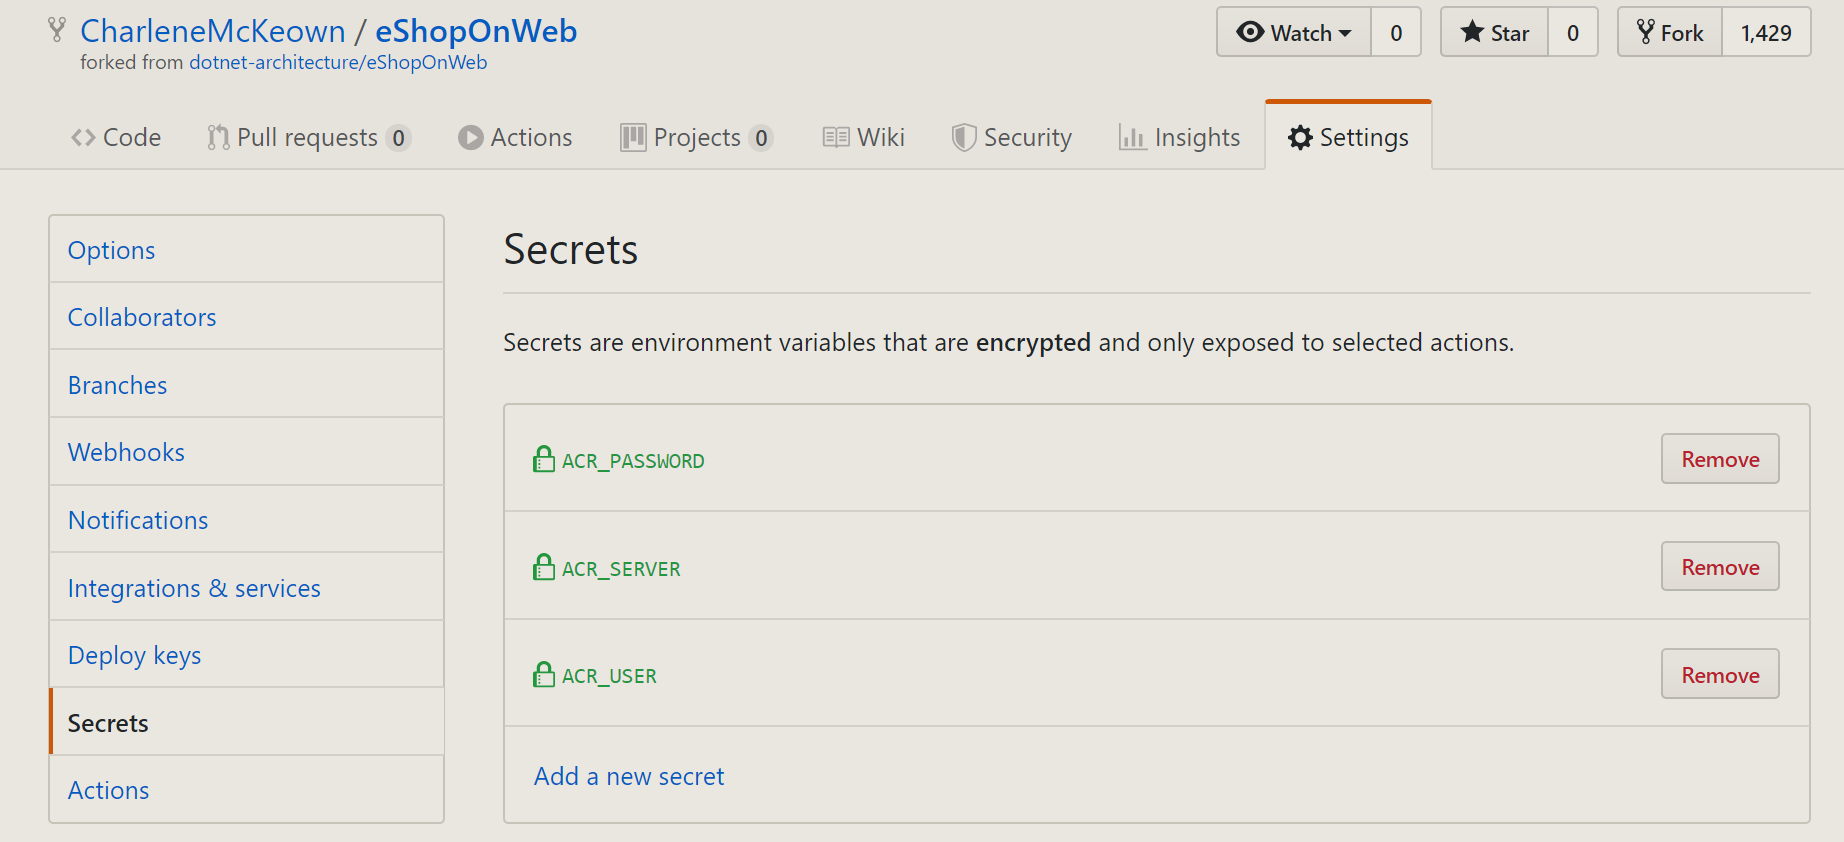
To make these secrets available to my action, I must set them as environment variables using with. You can refer to the documentation of the action you are using to know what variables it expects. In this case name, username, password, registry and dockerfile are required. To map an environment variable to a secret, reference it like so: username: ${{ secrets.ACR_USER }}.
Okay, so that’s my docker image taken care of.
For my last job, I will create a GitHub release. Now I will say, that I spent too many hours attempting to trigger an ADO Release pipeline instead. I can use the ADO Rest API to trigger a release, and successfully tested this using Postman and curl commands. However, I could not get this to work in a GitHub workflow, likely down to my own inexperience with yaml.
  create-new-release:

    needs: [build-web, publish-image]
    runs-on: ubuntu-latest

    steps:
    - uses: actions/checkout@v1
    - uses: ncipollo/release-action@v1
      with:
        token: ${{ secrets.GITHUB_TOKEN }}
        tag: eShopOnWeb-3.2
This is a pretty simple release action that releases a copy of my repo. I could get more specific with which artifacts I want to release, so please do refer to the action documentation for that. One thing I haven’t figured out how to do yet is to tag my release with an incremental version.. so the tag is hardcoded for now, which isn’t great. I have to create an environment variable of token set to ${{ secrets.GITHUB_TOKEN }} which is created by default, and is used to make authenticated GitHub API calls on behalf of the action.
That’s it! I make a change to my code, commit it to my repo and my workflow takes care of building and testing it, packaging it up in a Docker image and pushing it to my container registry.
But wait - there’s more :)
As I mentioned earlier, I really wanted to get some integration between my workflow and ADO release pipelines. I really like the governance that comes with release pipelines in ADO. I can have deployment approvals between stages, configure deployment gates and visualise my deployment really easily.
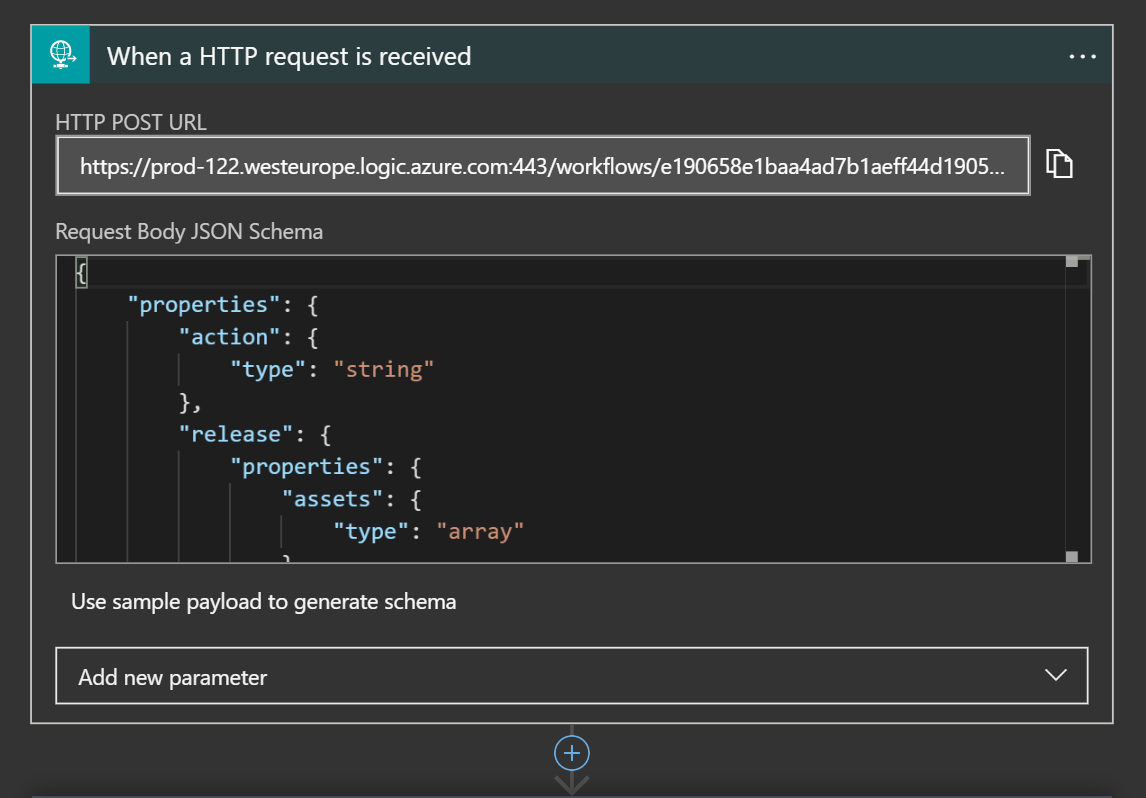
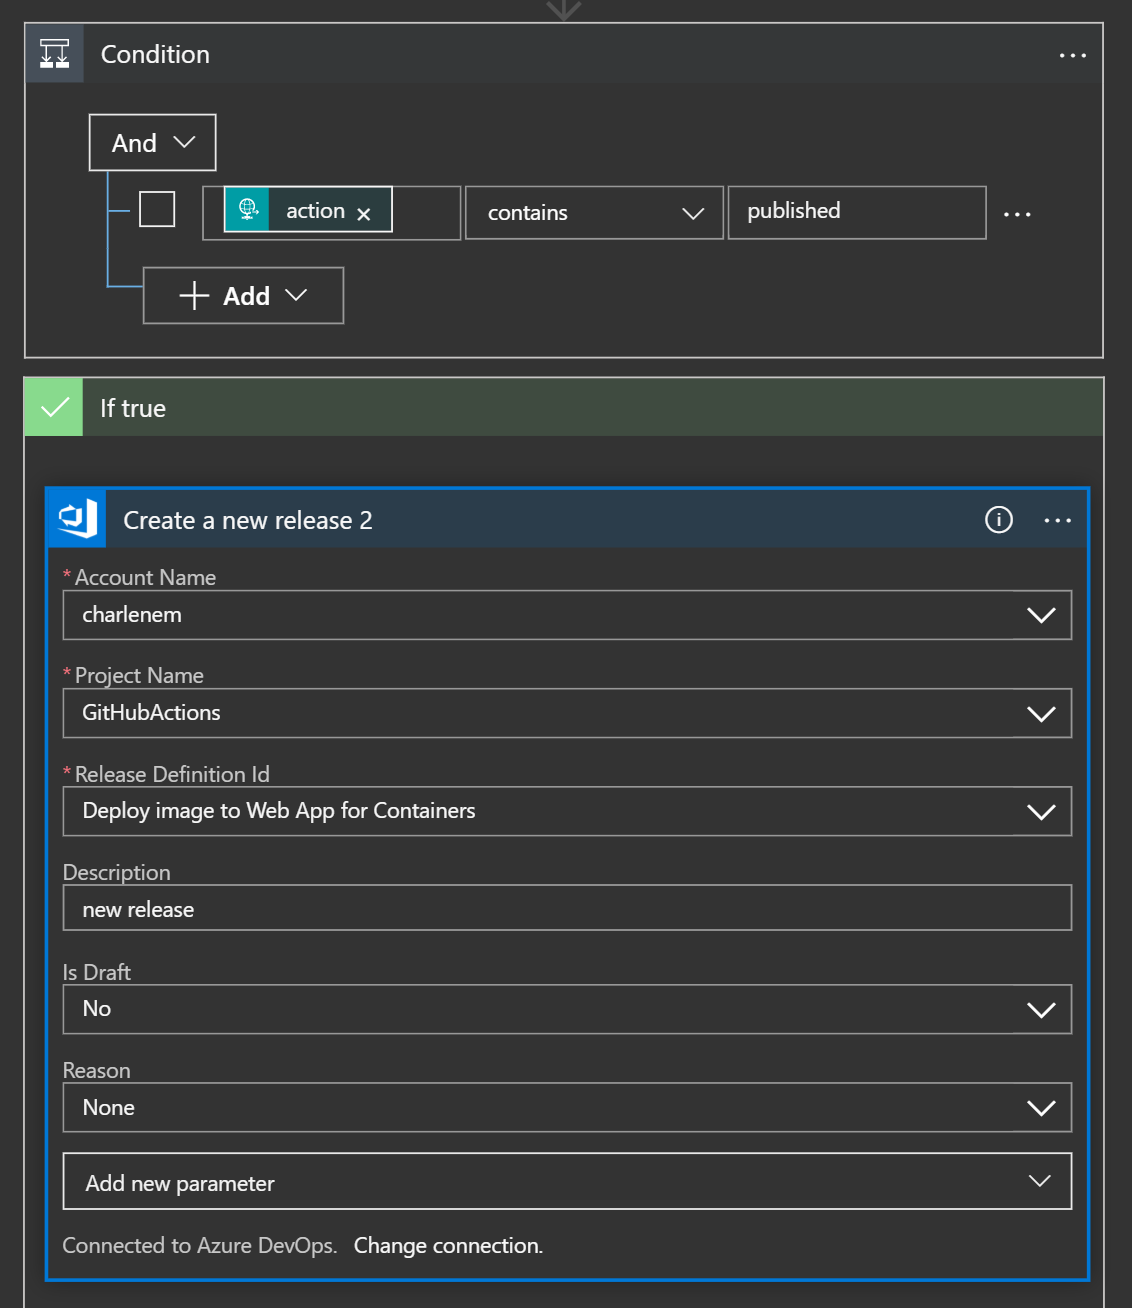
I tried and failed to use curl, so I fell back on a trusty Azure Logic App to do the integration for me. I decided that I would use a Github webhook which would call my Logic App if a release was published. The Logic App would in turn trigger a DevOps release pipeline.
The Github webhook will trigger on any release event, which is important when it comes to defining the Logic App… logic. You can see my logic app steps below. I had to make sure I added a condition so that the Logic App would check for an action of “published”, otherwise the logic app would trigger more than once (a release must be created before it is published). I make use of the built in connector for ADO which I absolutely love.
The logic app triggers my release pipeline, which is a really simple two stage deployment pipeline:
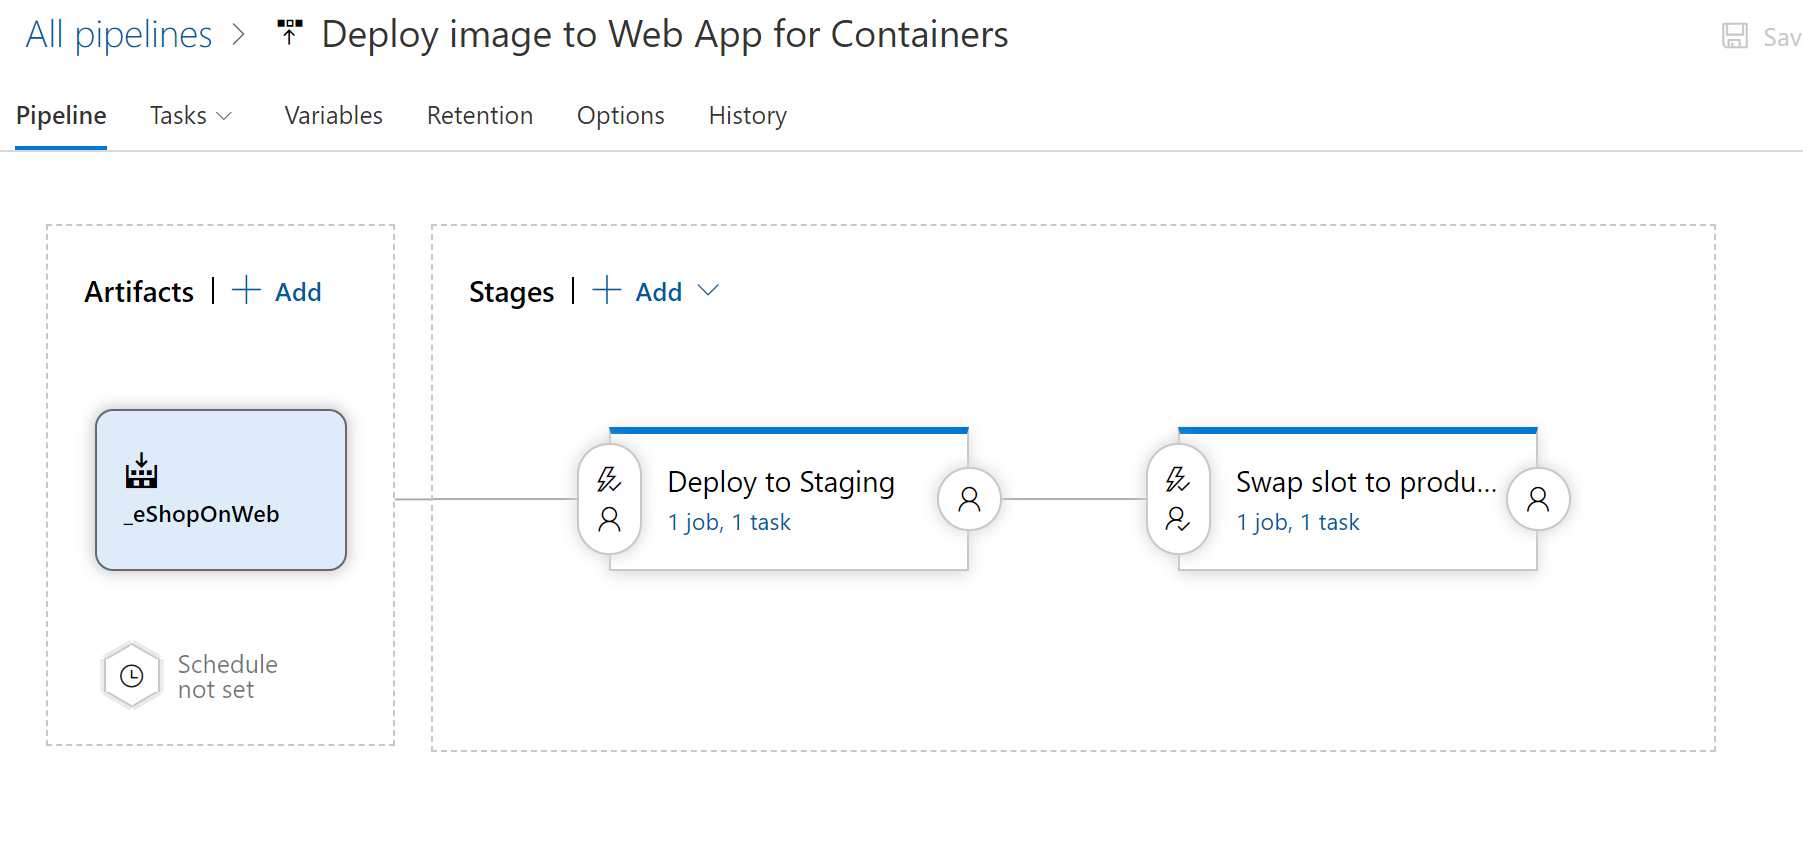
Stage 1 uses a marketplace task to deploy to the staging slot for a Web App for Containers. Stage 2 uses a marketplace task to perform a slot swap to production. I have a pre-approval in there for stage 2, but I could add a pre-approval for stage 1, post-deployment approvals, gates..
I am just getting started with yaml and GitHub Actions, and these are just some of the areas I want to look into more..
- Getting a better grip on environment variables
- Integration with Azure Key Vault as an alternative to using GitHub secrets. Azure DevOps has really nice integration with KV and variable groups.
- Integration with Azure Pipelines.. I have used Logic Apps but I think a cleaner solution would be to curl the Rest API.
- More complex workflows, chained workflows
- Best practice on integration with ADO (it doesn’t make sense to me to use both GitHub Releases and ADO release pipelines)