Securing code with GitHub
I’ll be using NodeGoat to explore some of the features in GitHub that allow us to keep code secure and free from vulnerabilities.
NodeGoat is an open source project maintained by OWASP, and it is purposefully riddled with typical vulnerabilities that can manifest themselves in Node.js applications.
In this blog, I’ll talk about how I:
- Enabled automated vulnerability alerts and security updates
- Set up a Static Application Security Testing (SAST) workflow
- Set up a Dynamic Application Security Testing (DAST) workflow
Note: Now - I’m no app security expert, and concepts covered in this post are fairly new to me, though I am keen to keep learning. I hope the content reflects that, in so much that I hope it helps developers discover these concepts and tools as they look to take on more responsibility for the security of their code.
Vulnerability alerts with Dependabot
Dependabot detects vulnerabilities in your project dependencies and alerts you to the fact. It does this by default on public repos and can be enabled on private repos (for free!). Dependabot depends (ha!) on GitHub Dependency Graph, which identifies all upstream dependencies and public downstream dependents of a repo or a package. Read more about it in this excellent GitHub blog post.
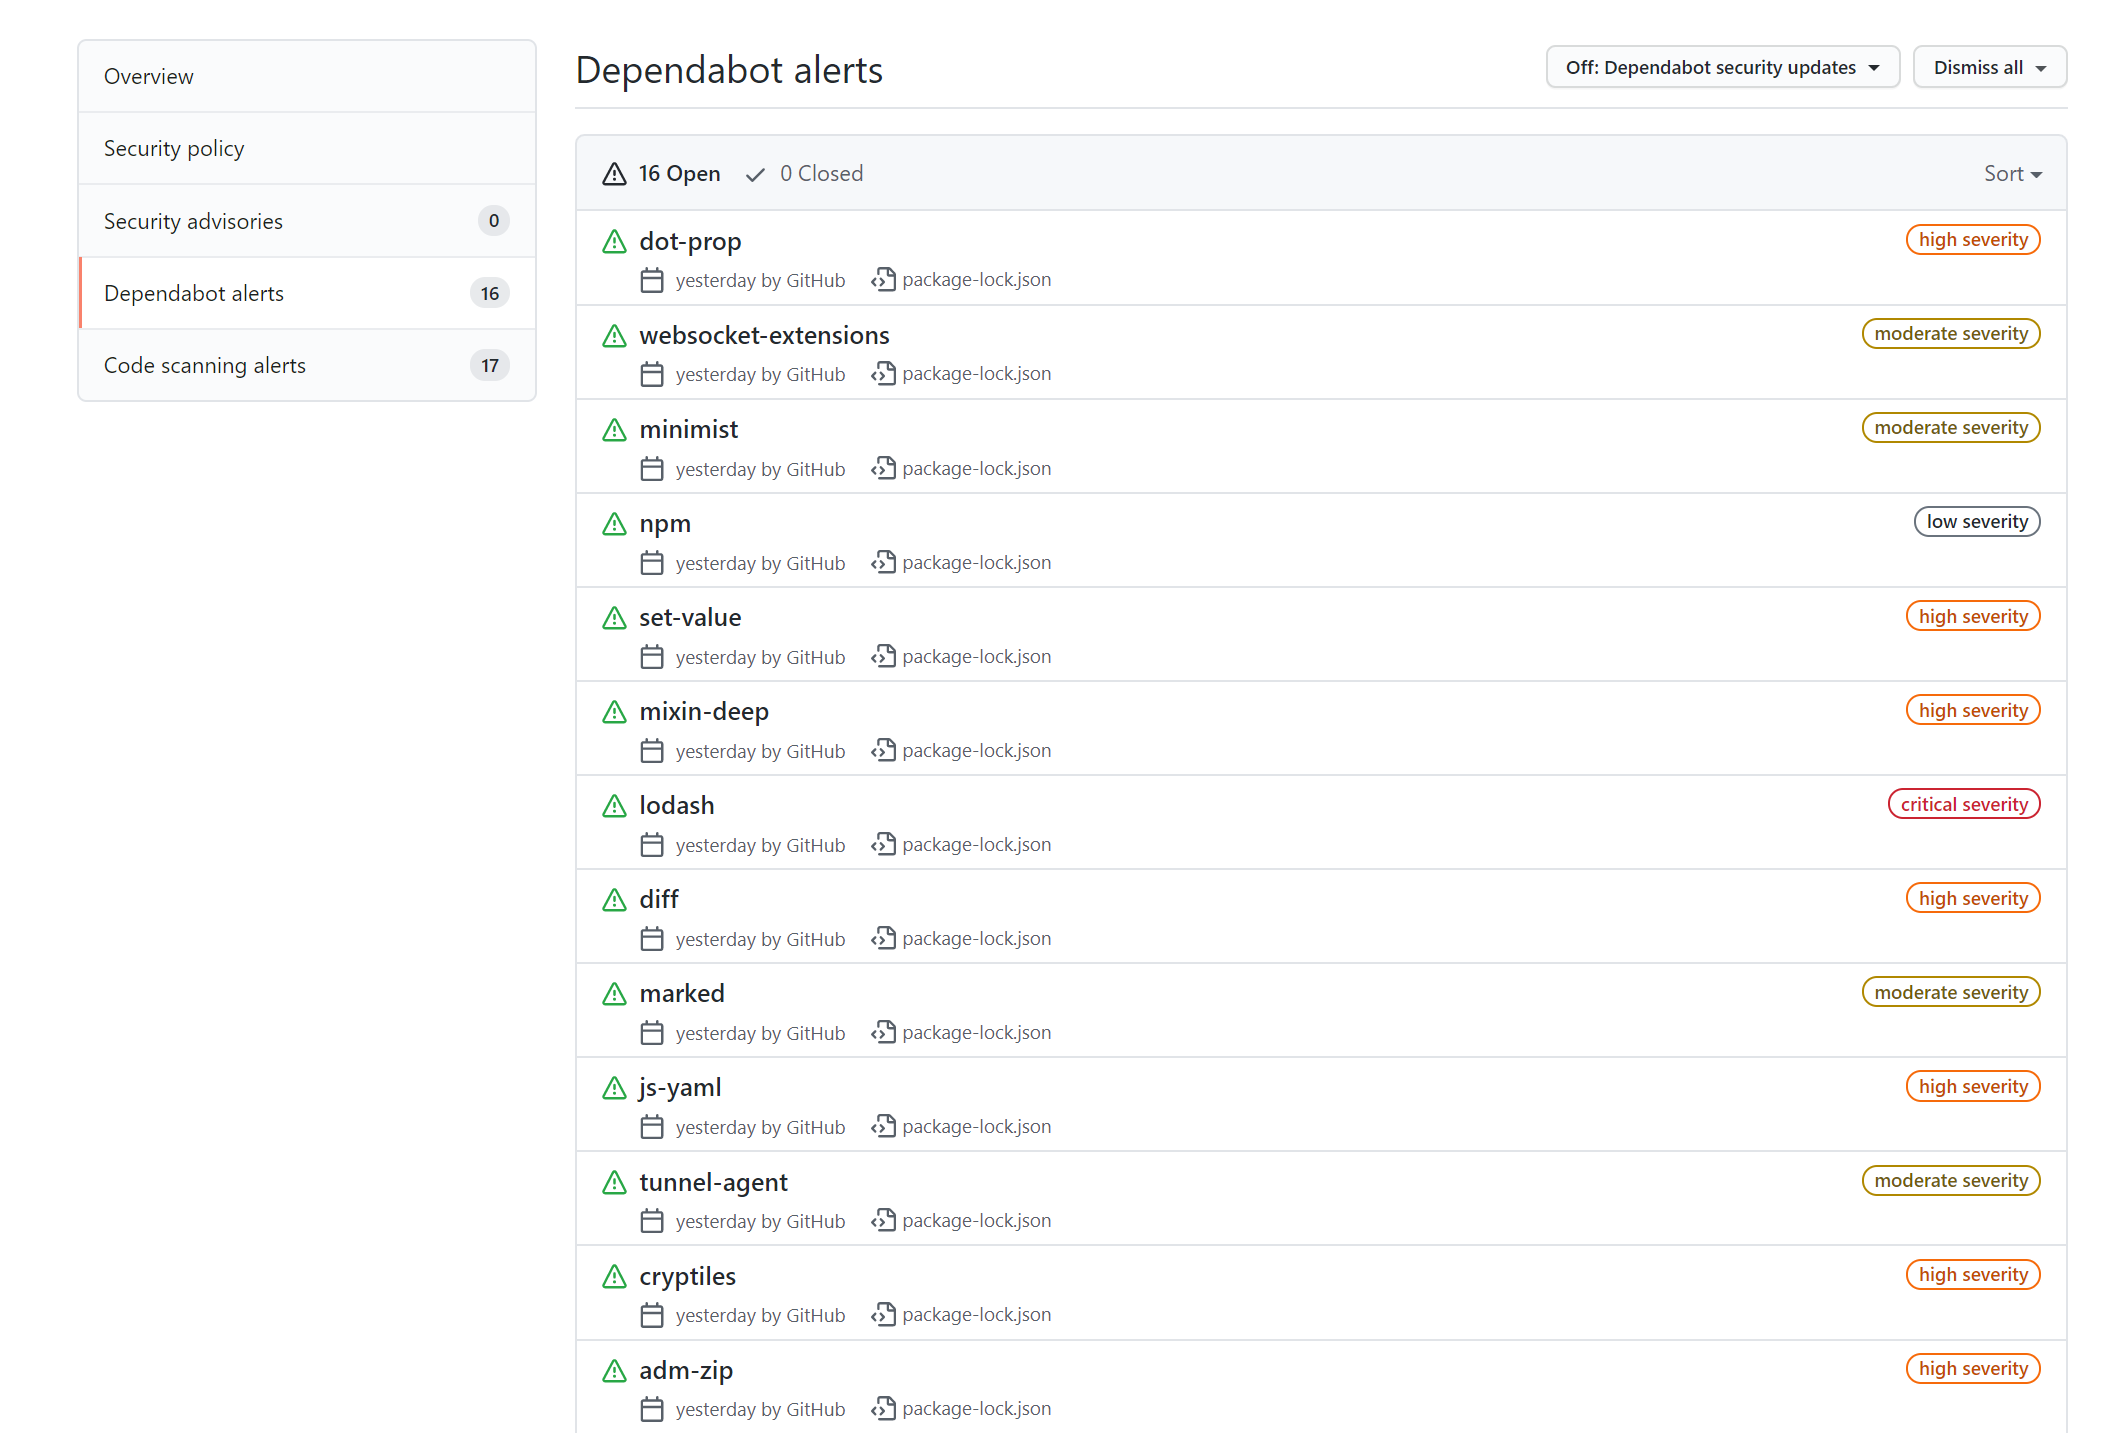
After enabling it on my forked NodeGoat project, I saw a bunch of alerts almost immediately in my Security tab:
If I choose websocket-extensions, which is classed as a moderate severity alert, I can dig into the detail:
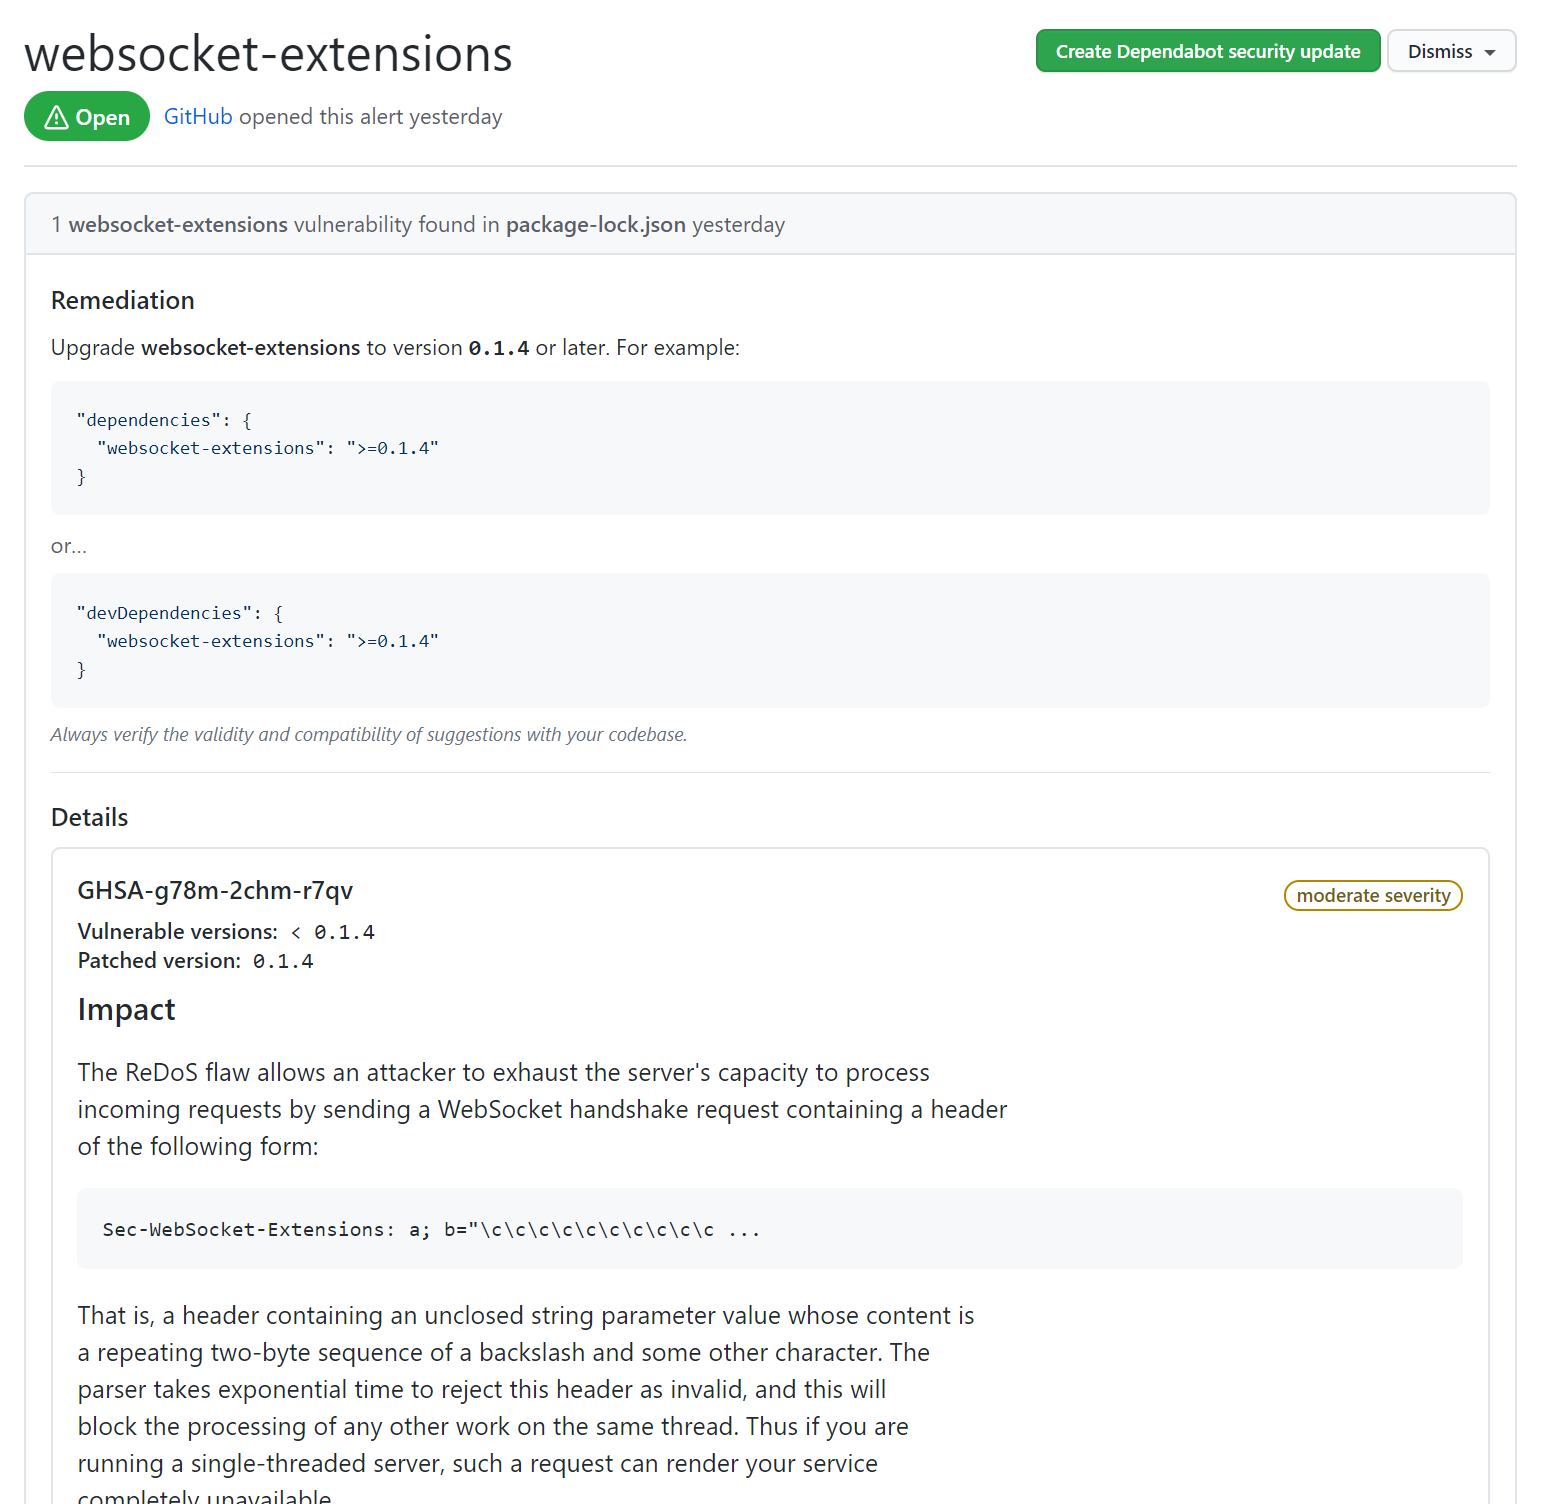
It tells me:
- the file affected by the vulnerability
- remediation steps
- details of the vulnerability
I can even click on Create Dependabot Security Update to let Dependabot generate the necessary fix!
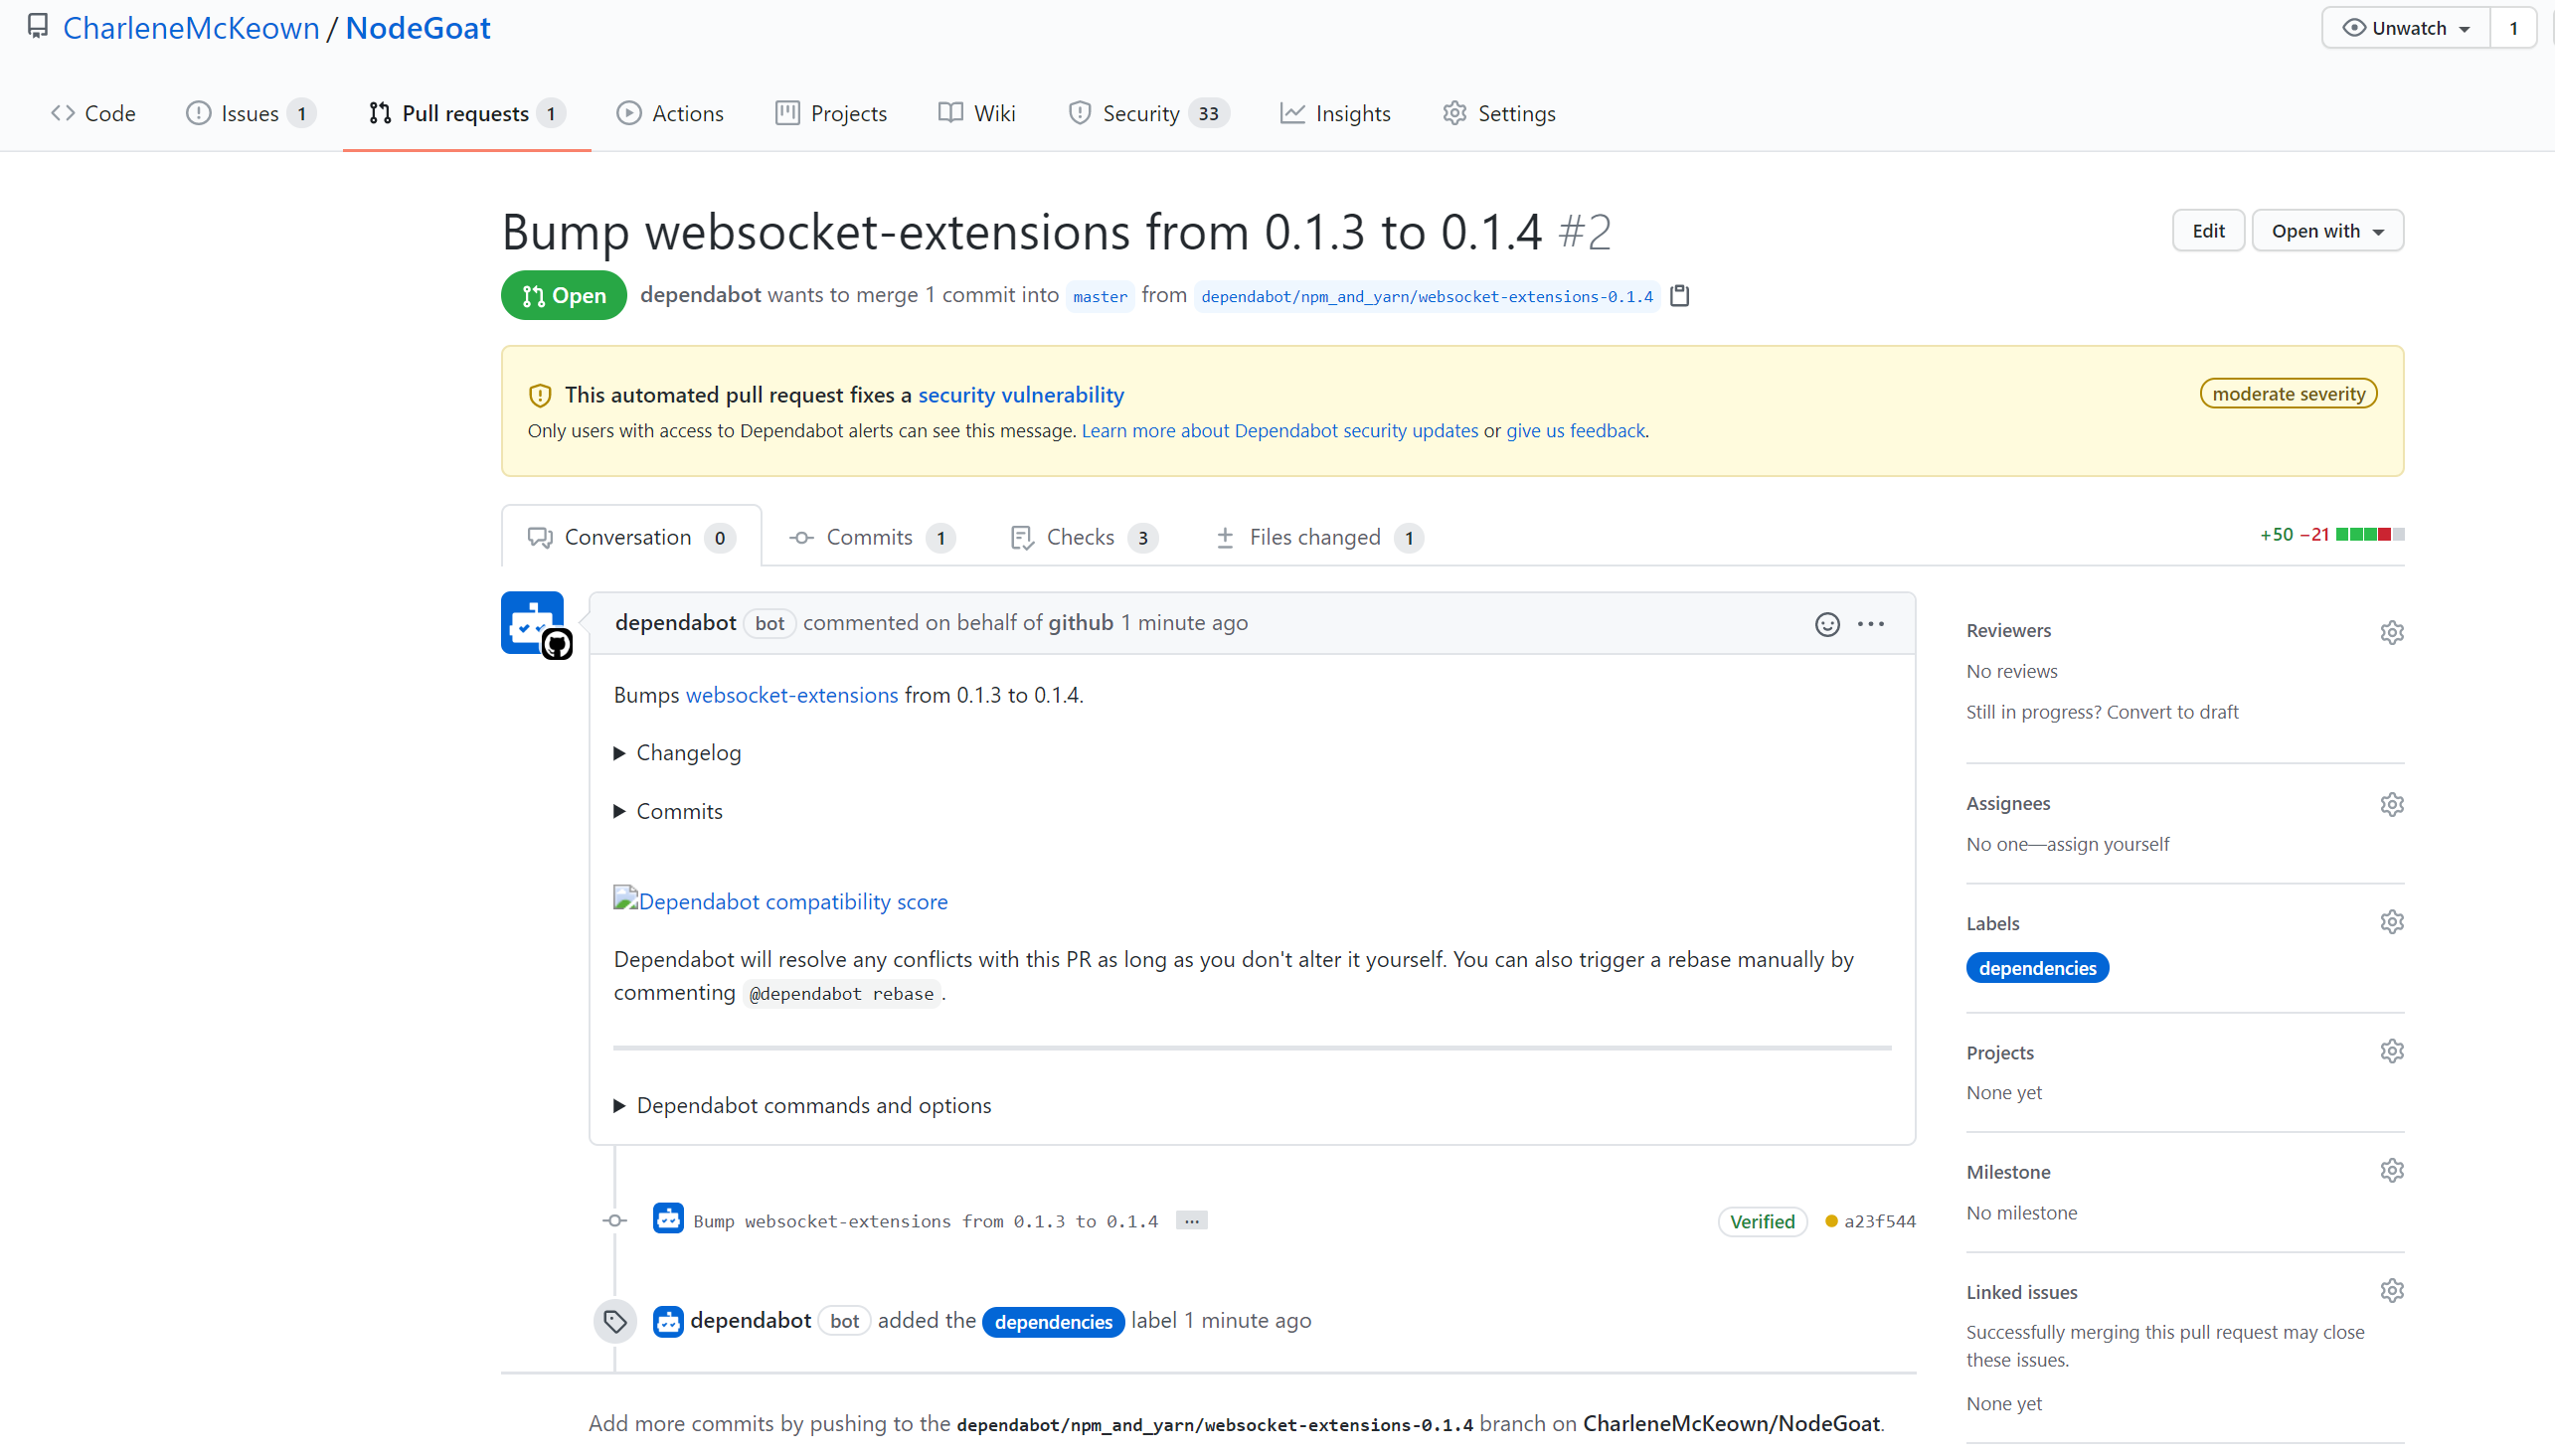
You can see here that Dependabot has created a branch and updated the dependency to the version specified in the remediation step. A pull request has been generated and is awaiting my approval. In reality you would also be running automated checks to ensure the dependency update didn’t break anything. I’ll go ahead and merge the PR to fix this vulnerability.
What I didn’t realise, is that by allowing Dependabot to create a security update for me, for that one vulnerability, I enabled it for the repo. A new PR has appeared to fix mixin-deep. Cool!
Some of the vulnerabilities can’t be automatically fixed, most likely because doing so would render other dependencies incompatible. For a project as broken as this one (as it’s a learning project), we would definitely need to do some manual fixing and testing. I have used Dependabot briefly on another project and experienced a high success rate on automatic fixes.
Dependabot is a handy tool, but you shouldn’t depend on it completely to catch and fix every vulnerability in your projects.
Static Application Security Testing (SAST) with CodeQL
Next, I decided to explore static code analysis capabilities. I have used SonarQube with Azure DevOps pipelines in the past, and I was keen to try something new.
GitHub acquired Semmle almost a year ago and with it, CodeQL, a semantic code analysis engine. It can scan your code, looking for problems and vulnerabilities, and then create alerts in the repo. Once the problem is fixed, GitHub closes the alert.
One of the cool things about it, and something I’d love to continue to learn about, is that you can create your own queries. The QL (query language) is open source and is used by security researchers to create queries for scanning code. You can play around with it here.
It’s really easy to get started with CodeQL.
Note: Code Scanning is in limited public beta as of August 2020, so you may not have seen this light up in your repo just yet. You can request access here.
In the Security tab on the repo, you can select Code scanning alerts and then select CodeQL Analysis - Set up this workflow.
What happens when you do this is you create a GitHub workflow file, which will be used by GitHub Actions to carry out some jobs.
Note: I talk more about GitHub Actions in a previous post.
There is actually very little I needed to do to get this to work first time. I simply skipped to lines 34 & 35 and updated it from this:
      # with:
      #   languages: go, javascript, csharp, python, cpp, java
to this:
       with:
         languages: javascript
Once I saved it, I just had to enable Actions from the Actions tab on my repo.
After it ran successfully, I had a peek at the workflow logs. In the screenshot below, I can see that the CodeQL analysis action has compiled query plans for 66 queries and then evaluated those queries against my code base.
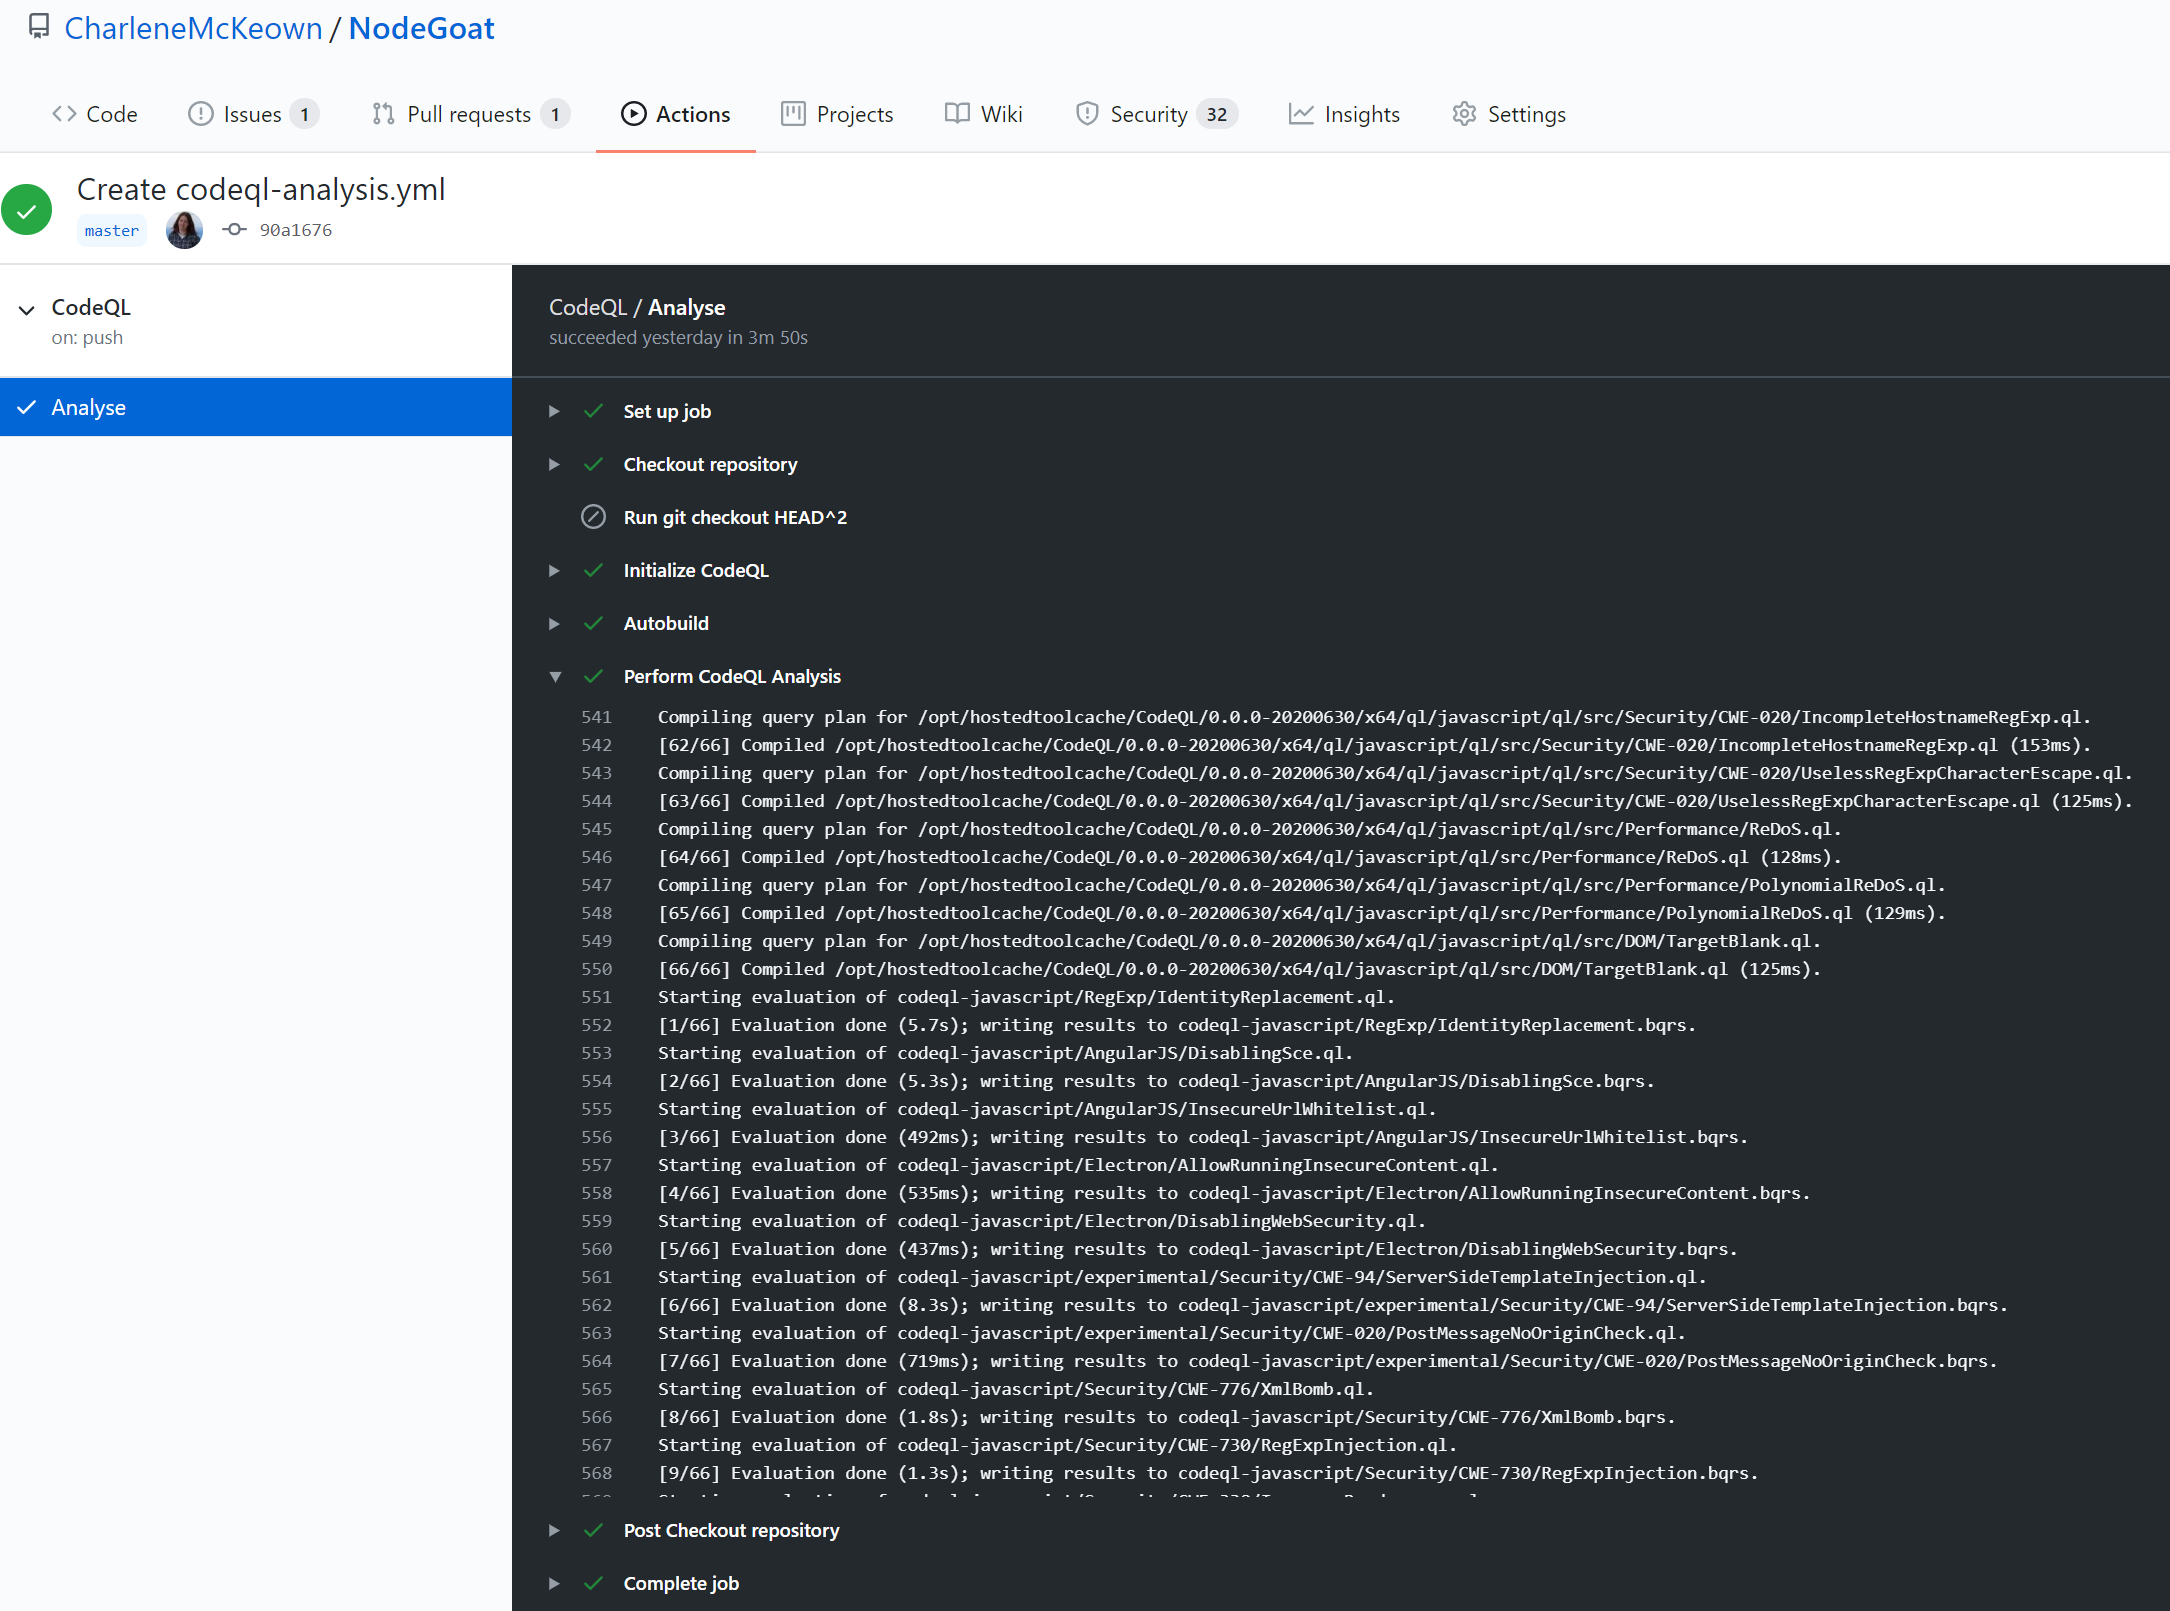
Results are published under the Security tab - and it looks like CodeQL found 17 issues with the code - including issues with potential for code injection and cross-site scripting. These are two of the OWASP Top 10 critical risks for web applications.

Clicking on one of these gives me a trove of information. I can see:
- Status and type of alert
- Labels for the CWE and clickable links to take me to MITRE
- The affected file
- Rule ID and a description of the error
- Recommendations
- Code examples
- References
- When the error first appeared (along with commit ID)
Phew - that’s a lot of information! I decided to try and fix the first code injection issue, using the NodeGoat tutorial.
This involves updating the code to validate the user input. The bad code looks like this:
        // Insecure use of eval() to parse inputs
        const preTax = eval(req.body.preTax);
        const afterTax = eval(req.body.afterTax);
        const roth = eval(req.body.roth);
I need to update it to validate that the input is in fact an integer before processing it, using the parseInt() function to convert user supplied data instead of eval().
        //Fix for A1 -1 SSJS Injection attacks - uses alternate method to eval
        var preTax = parseInt(req.body.preTax);
        var afterTax = parseInt(req.body.afterTax);
        var roth = parseInt(req.body.roth);
After doing that, my CodeQL workflow runs again to re-run analysis on the code base. This is because by default, it’s running on every push to the main branch.
Upon checking the CodeQL results - success! I fixed my code injection problem!
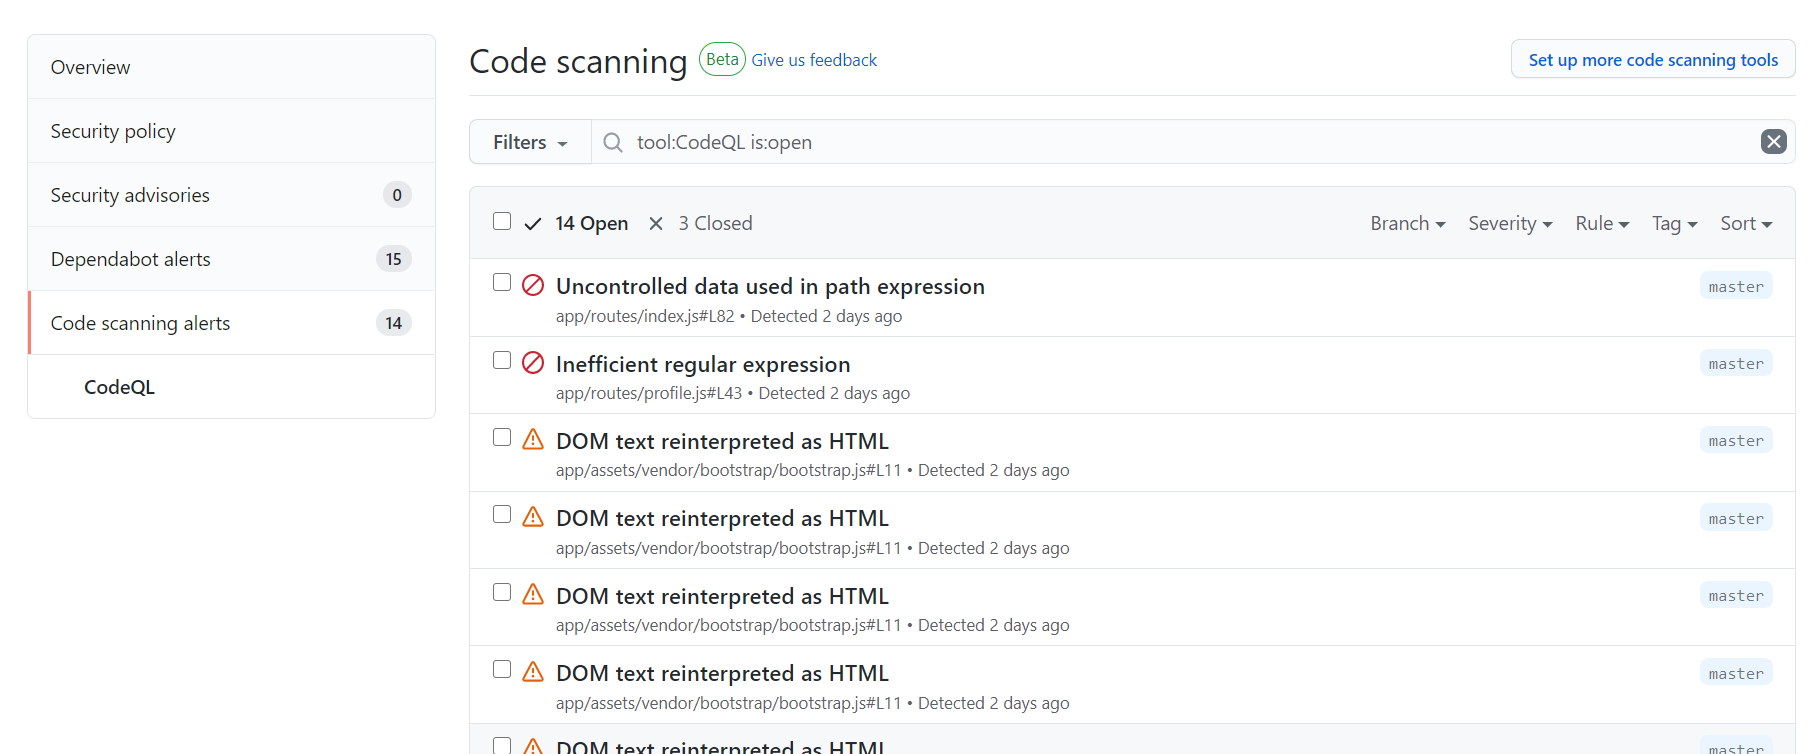
I can see that I still have 14 open issues, but 3 have been closed which I can view - so I still have that history which is nice.
Dynamic Application Security Testing (DAST) with OWASP Zap Scanner
Okay so, that’s static code scanning. Pretty cool stuff. I already set up a workflow to deploy the application to Azure, so it would be nice to perform some dynamic app security testing on it. That basically means that I need some kind of tool to communicate with my web app’s front end to help me identify vulnerabilities whilst it is operational.
For this, I decided to use OWASP Zap Scanner. Handily, there is a GitHub Action for this in the marketplace (a couple, actually). I decided to go for Zap Action Full Scan.
Again, setting this up is really simple. In the Actions tab, I set up a new workflow and this time I search for the action in the marketplace:
My workflow looks like this:
name: owasp-scan

on:
  workflow_dispatch:
    branches: [ master ]

# A workflow run is made up of one or more jobs that can run sequentially or in parallel
jobs:
  # This workflow contains a single job called "scan"
  scan:
    # The type of runner that the job will run on
    runs-on: ubuntu-latest

    # Steps represent a sequence of tasks that will be executed as part of the job
    steps:
    # Scans your target website
    - name: OWASP ZAP Full Scan
      uses: zaproxy/action-full-scan@v0.1.0
      with:
        # GitHub Token to create issues in the repository
        token: ${{ github.token }}
        # Target URL
        target: 'https://nodegoat.azurewebsites.net/'
        # Relative path of the ZAP configuration file
        #rules_file_name: # optional
        # The Docker file to be executed
        docker_name: 'owasp/zap2docker-stable'
        # Additional command line options
        #cmd_options: # optional
        # The title for the GitHub issue to be created
        issue_title: 'ZAP Full Scan Report'
I have set it to be manually triggered, rather than running on a push or pull request trigger. With DAST scanning, you should be careful. You could end up sending a lot of messages, for example through ‘contact us’ forms to whichever service you have processing them.
I looked in the logs after running the Zap scan workflow, and this is the result:
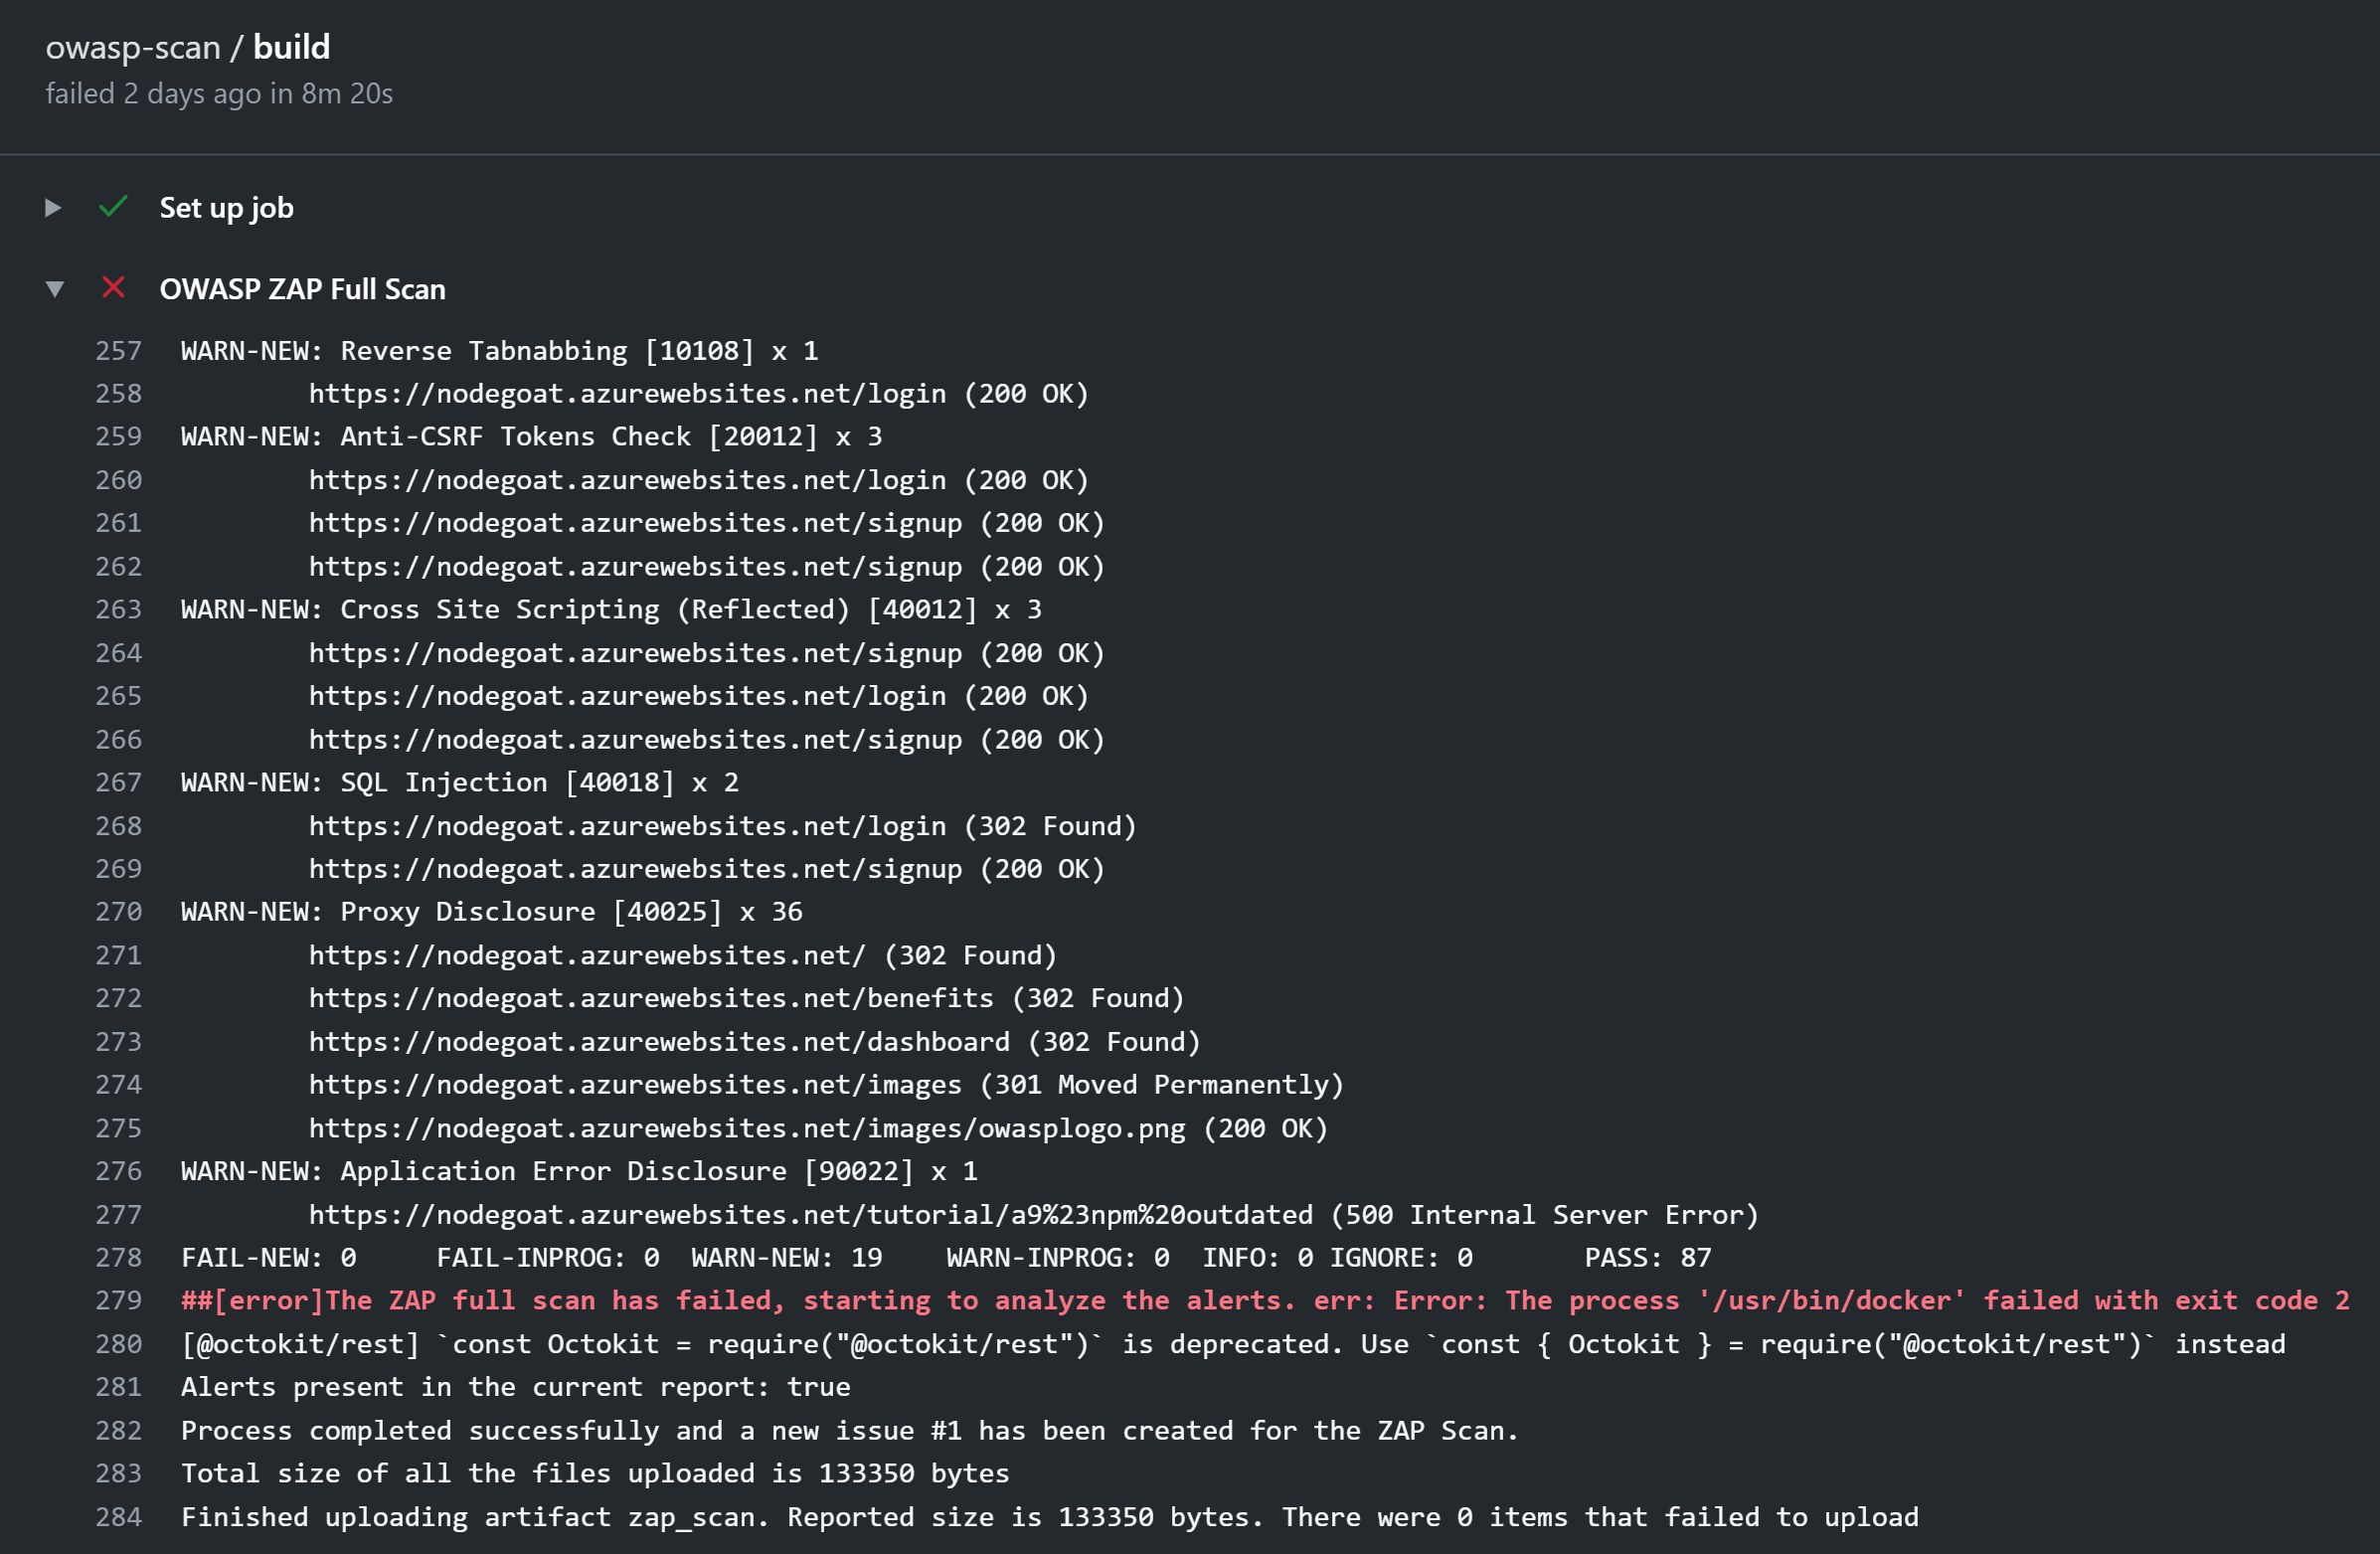
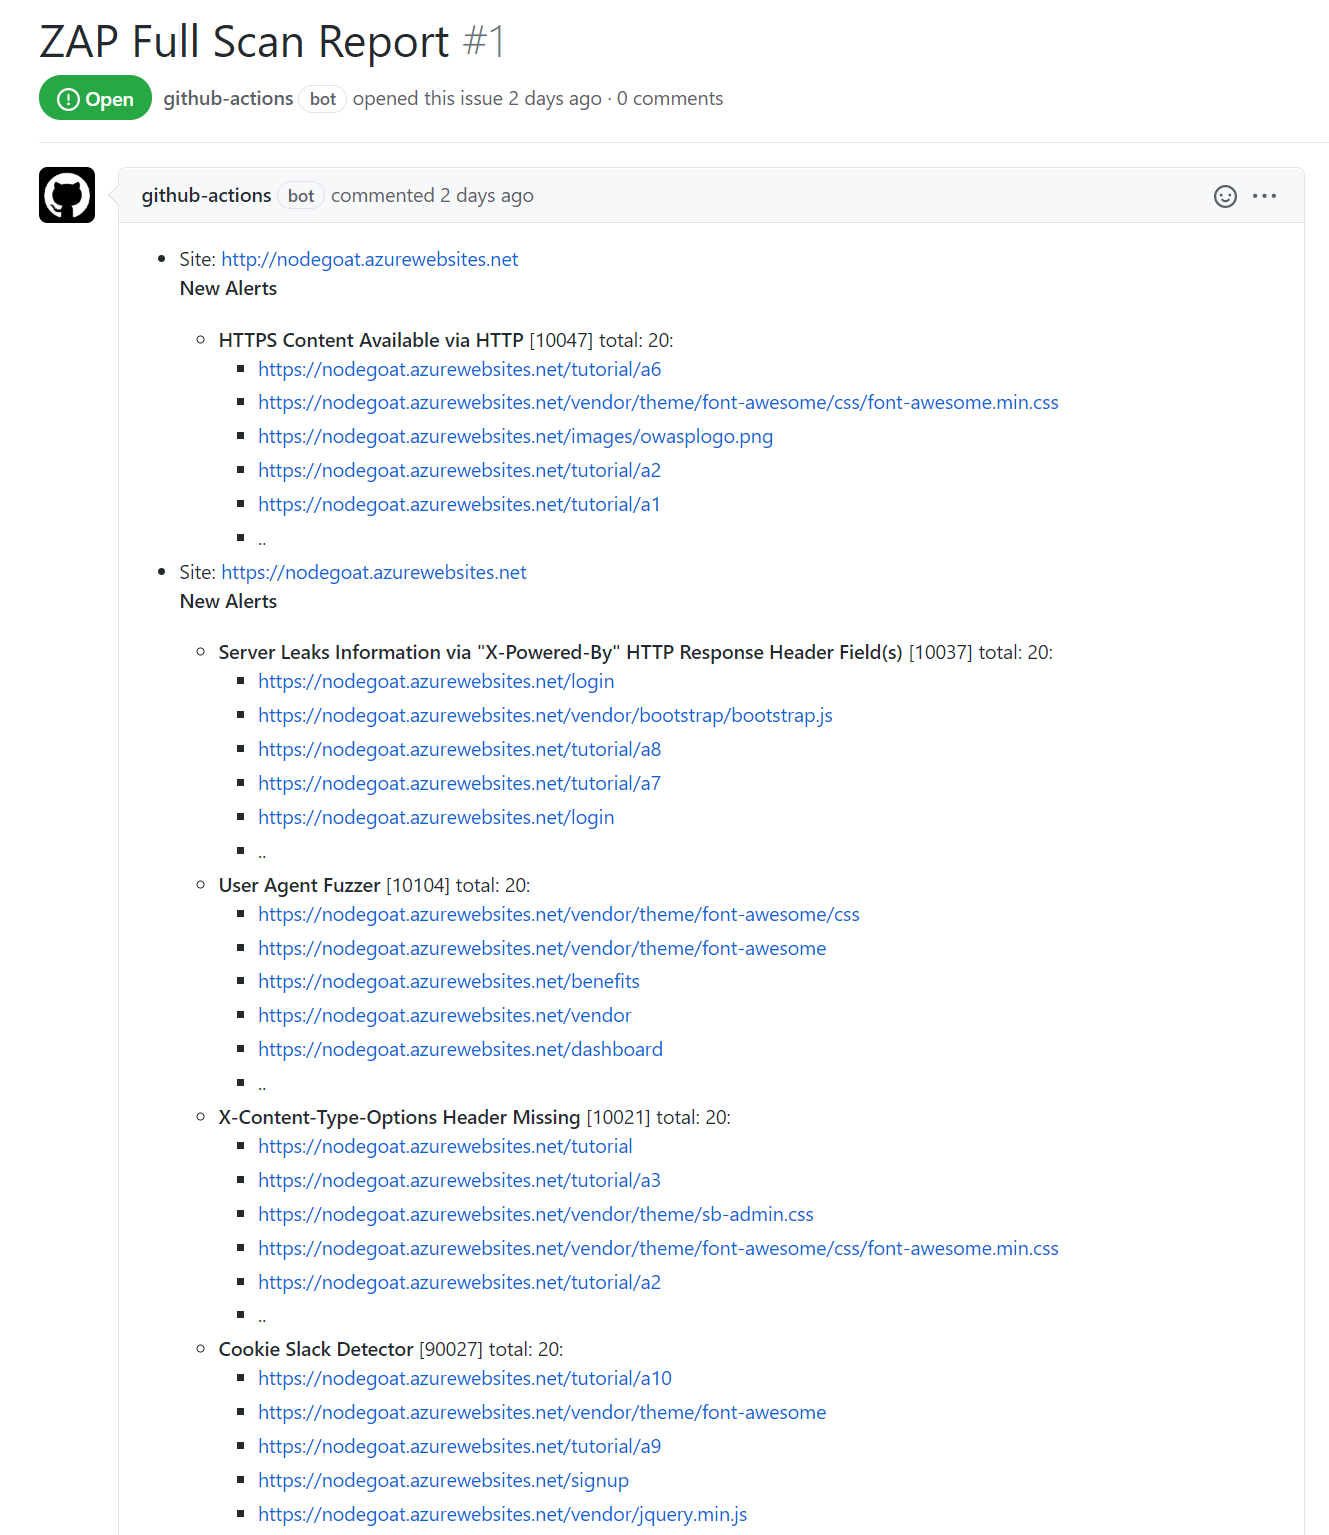
I can see I had a bunch of passing tests, but also a bunch of new warnings. The workflow produces an artifact with the report in HTML, MD and JSON formats. Handily, it also creates a GitHub Issue for me to go have a look at.
After fixing some more issues, I ran the report again. How the Zap Action handles this is, it updates the issue it created when the report first ran. It highlights any new issues, and clearly reports on which issues have been resolved:
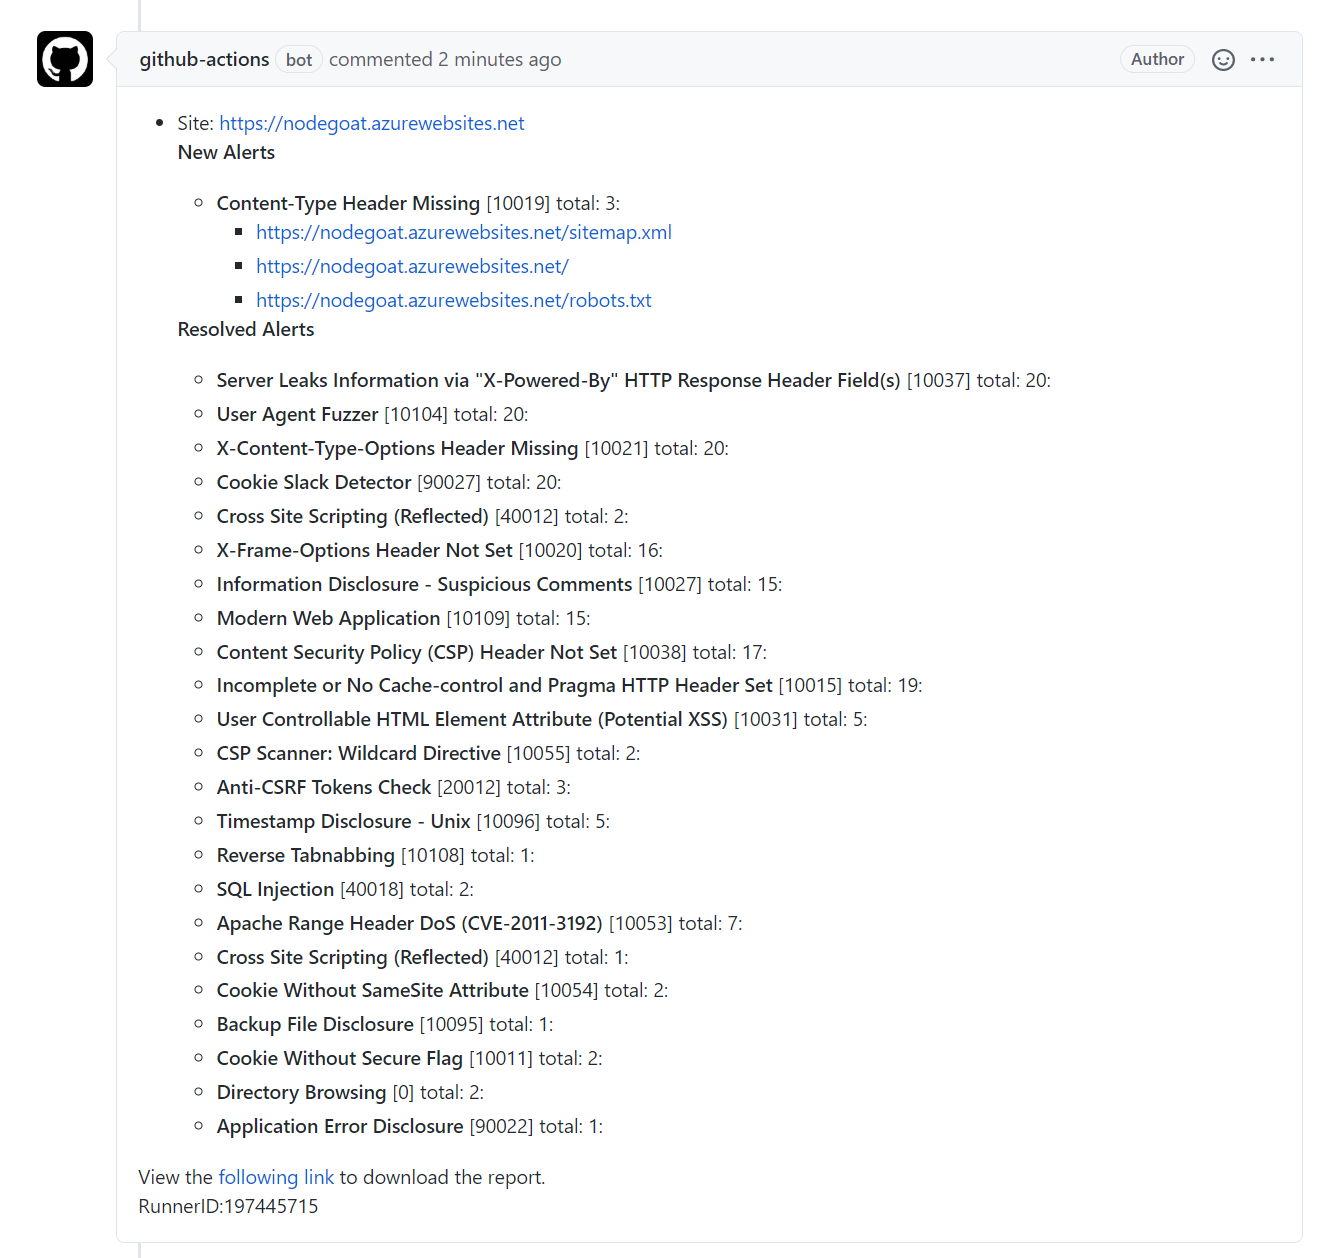
I’m not quite sure how I managed to introduce some new issues, but I can see that at least the ones I fixed are reported as resolved.
Summary
That’s it! This was a quick whirlwind around some of the security capabilities in GitHub to help keep code secure. Highlights for me:
- The absolute wealth of information you get about vulnerabilities and security issues without ever having to leave GitHub.
- Labels with clickable links to CWEs on MITRE.
- The ease of setting up security scanning workflows
I’m keen to keep learning and I hope you are too!
Further Reading
Secret Scanning - I love this. GitHub has partnered with service providers, so that if a secret for say, Azure or AWS is detected in a repo, that secret can be automatically revoked. That’s amazing!
Dependency Graph - This is a very good explanation of the GitHub Dependency Graph, published in August 2020.
GitHub Developer Guide to App Security - this is an informative guide to app security approaches and covers some of the GitHub features I looked at in this blog.